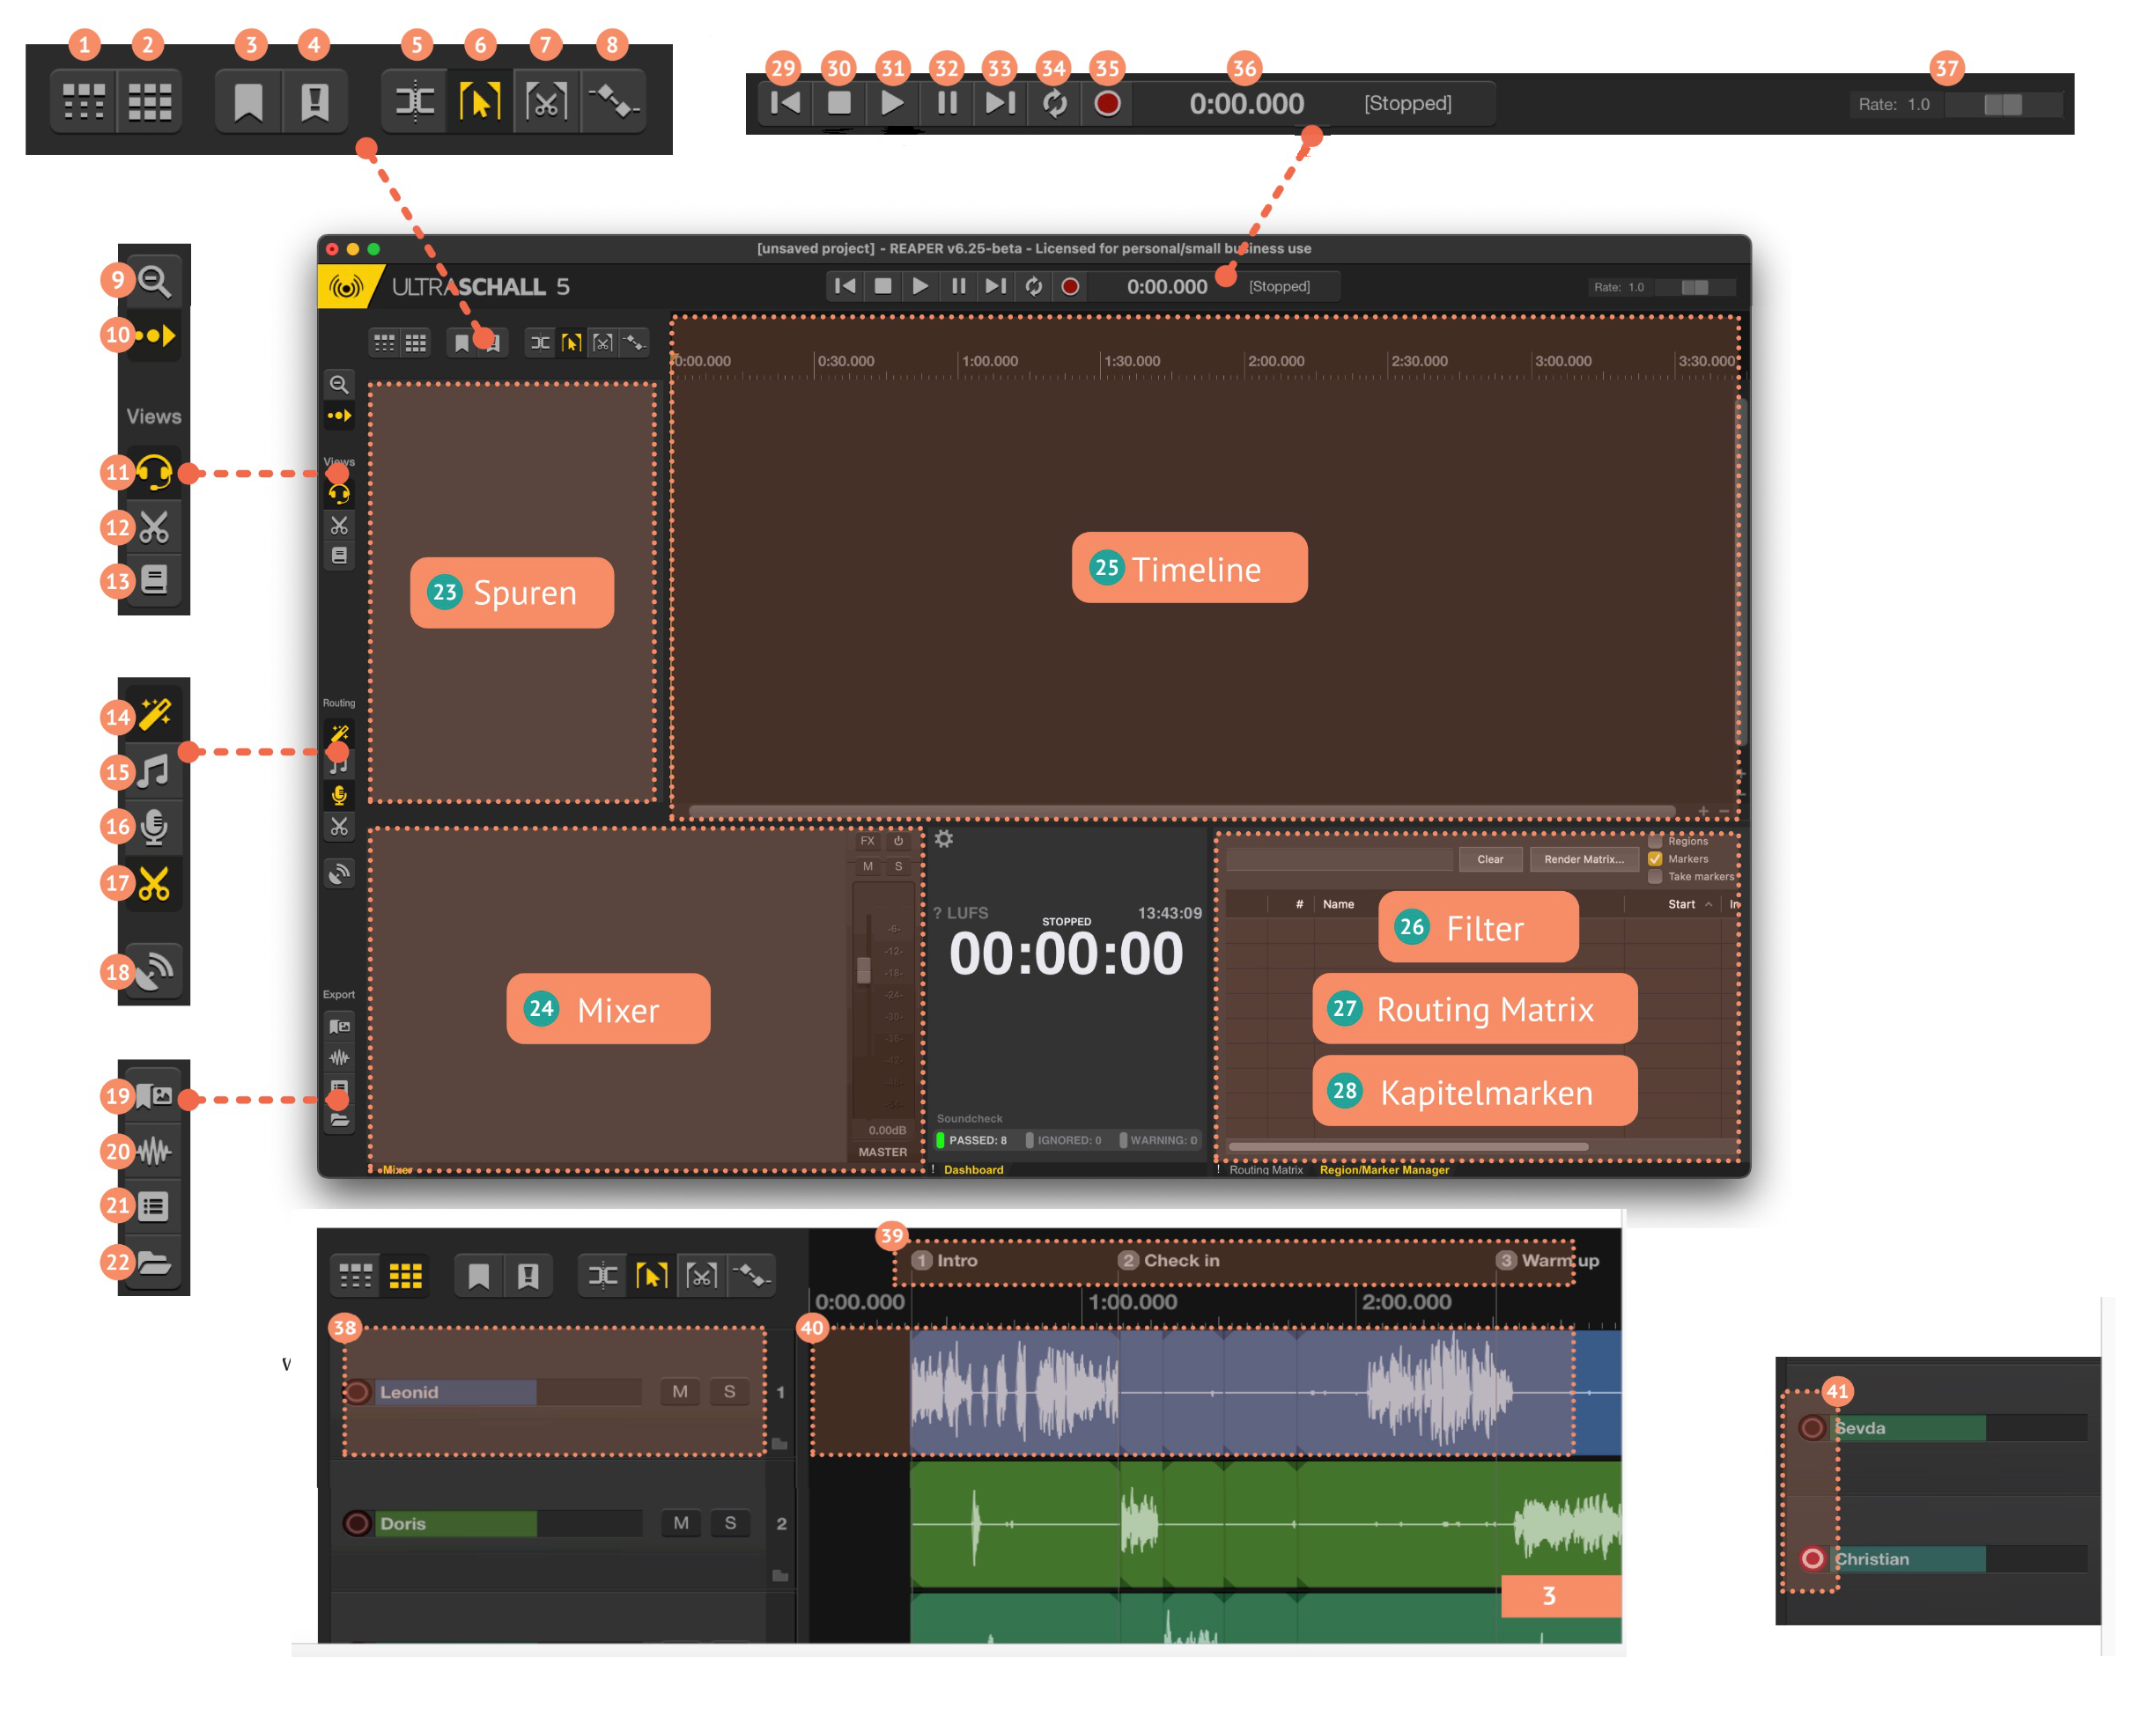
Overview of controls and areas
 Overview: Control elements and areas | Copyright © Leonid Lezner CC-BY 2.0
Functions of the controls
Buttons: Cut
(A detailed description of the functions can be found in the Chapter Cut.
- Keeps the elements in a track together when an element is moved.
- keeps the elements together across all tracks when an element is moved.
- sets an unnamed chapter marker at the cursor position - alternatively: key M or Shift+M to add a named chapter marker
- sets an edit marker at the current cursor position - alternatively: key E.
- Disconnects the selected track at the current cursor position - alternatively: key S.
- Toggles between selection (button active) and move tool (button deactivated).
- cuts the selection across all tracks and closes the gap - alternatively: keys Ctrl+X (Win) or Cmd+X (Mac)
- shows (button active) or hides (button deactivated) the mute envelopes.
Buttons: Zoom
- Zooms out completely to show the whole project.
- automatically tracks horizontal scroll position of timeline (if active) - orients to time position when playing or recording.
Buttons: Views
- Activates view "Recording" - focus on the controls that are important for a recording.
- Activates the "Editing" view - focus on the controls that are important for editing.
- activates view "Storyboard" - focus on the controls that are important for "built" contributions.
Buttons: Routing
- Enables or disables automatic routing between inputs/outputs and tracks (if disabled, buttons 15-17 are ignored).
- sets routing to "Pre-Show" - useful for live streaming (local signals are not transmitted via the stream).
- set routing to "Record" - all tracks end up in the master track
- Set routing to "Cut
- starts live stream via studio link
Buttons: Export
- Shows the overview of chapter markers.
- Shows the dialogue for audio rendering.
- shows the podcast export assistant
- opens the project folder
Area: Work surface
- Tracks section: shows the different tracks of the project.
- Mixer area: represents a separate slider for each track (via the slider you can also quickly access the filters for the respective track) - in addition, the master slider, which controls the mix level, can also be found here.
- timeline section**: the core of the project; here you can see the waveforms of your tracks, but also cuts, markers, envelope processing and much more.
- Filter area: appears as soon as you press the FX button of a track.
- Routing matrix: connects the inputs and outputs to individual tracks and thus determines exactly what is heard by which participant or on which stream
- Chapter marker area: displays the chapter markers set with buttons 3) and 4) as a list and enables clear management and editing
Buttons: Playback
- Back button: jumps to the beginning of the project.
- Stop button: stops recording or playback and returns the playback cursor to the edit cursor.
- Play button: plays - as long as the button is active, you cannot change the output interface
- Pause button: pauses recording or playback (temporarily), but leaves the playback cursor at the current playback position, so that you can continue directly from this point.
- Forward button: jumps to the end of the project
- Loop button: plays the selected section of the timeline in an endless loop
- Record button: starts recording
- Timecode display: reflects the current playback position - double-click on the display to set the exact time at which you want to place the playback cursor.
- Play speed knob: sets the speed for playback - the default is '1' times the speed, if you set '1.5' here, for example, your audio will run 50 percent faster
After finishing the edit, you should set this back to 1x speed so that your audio is exported at the correct speed.
Detailed view: Tracks
A track can contain either audio data or meta information (for example, volume). Each track has a name. With the button M ("Mute") you mute the track - and with the button S ("Solo") you mute all other tracks so that only the selected track can be heard. Since version 5 of Ultraschall, each track is automatically assigned its own colour.
Directly above the waveforms in the timeline view you will find the chapter markers at their respective playback positions. With the mouse you can easily move the chapter markers to the desired position, a right click and Edit marker... lets you edit the name and the colour, Remove marker... removes the respective marker. (Also applies to edit markers).
Here you can see the waveforms of the individual tracks. 41.
41. in order to actually store an audio signal in a track during a recording, the track must be activated for recording or "armed". You can see whether the track is activated for recording by the small red recording indicator (round, white circle on red background; lights up when active) next to the track name. Once you have finished recording, you should deactivate all tracks again so that you do not unintentionally overwrite your recording and no signals can be heard through the connected microphones during editing. The easiest way to do this is to select the item 'Prepare all tracks for editing' in the 'Podcast' menu, which deactivates all tracks for recording, but also makes other sensible settings (such as changing the routing or stopping live streams).
Many of the points listed here are explained in more detail in the respective chapters of this documentation.