Post-Production
Introduction
Your podcast is recorded and edited? Then it's time for post-production. The aim of this chapter is to improve the sound of your podcast - even if it already sounds good. Here you will learn about the effects of ultraschall and how to use them.
There is a very good tutorial video on this topic.
Why post-production makes sense - and where the limits lie
One thing right from the start: the better your recording, the less work you have to do with it in post-production. It is therefore worthwhile paying attention to ambient noise and interference from the outset, to eliminate mains hum, to fine-tune speaking distances and recording levels, and to ensure the best possible recording conditions overall. Nevertheless, post-production is always important and useful for an optimal result.
The goals of post-production are (in descending relevance):
- Mixing the individual tracks: Different voices and players sound differently loud in the recording. In the mix, these differences are reduced in favour of a harmonious whole.
- Raise the loudness of the podcast to -16 LUFS (or other desired value): Podcasts are listened to in very different environments - not only at home, but also in the underground, for example. In order for everything to be understood well, the entire mix must have a certain volume. -16 LUFS has established itself in podcast circles.
- Reducing noise: Depending on the recording situation, the tracks contain more or less interference - such as noise, room sound, echo, crosstalk from other microphones or mains hum. These noises can be reduced, at least in part, with a reasonable amount of effort.
- Optimising the sound image: Depending on taste, further sound shaping, for example with the help of an equaliser (EQ), ensures the desired sound result.
Ultraschall gives you a free hand and all the options for manual post-production - but if necessary, it also takes you by the hand via the Automated Mixing Pipeline (AMP) and guides you through the most important steps (see also section Automated Mixing Pipeline (AMP)).
In addition, Ultraschall offers you a useful Pre-selection of effects for each track; you will find them in the bottom right corner of the Filter section [26] after you press the FX button in the Mixer section [24] on the desired track:
- DeNoise (ReaFir noise filter for reducing noise or hum by teaching interference profiles).
DeEsser (multiband compressor to reduce sibilants in the voice).
-
ReaEQ (multi-band equaliser with various presets - for example, also "telephone sound")
-
Ambience (room simulator with different presets - such as studio or church)
Ultraschall Dynamics 2 (adjustment of the loudness of a track, reduction of background noise and expander).
In the plug-in directory "Best of Breed" you will also find some other free but very powerful effects:
ReEQ (equaliser based on the well-known Fabfilter)
-
Smooth Limiter (top-class limiter that very clearly visualises the degree of intervention and is also built into the new LUFS Loudness Metering effect - pure audio gold).
-
Spectrum Matcher** (EQ with learning function to match the sound of microphones).
TriLeveler2 (good alternative to our Dynamics 2 effect)
- ReaXcomp (top-class graphic multiband compressor)
Despite the many possibilities to enhance recordings afterwards, the old audio wisdom holds true: Garbage in, Garbage out. If recordings have too much echo, noise, dropouts, hum, crosstalk or one of the other countless possible disturbing influences, then only limited improvement can be expected from post-production. With any effects plug-in, "too much" quickly leads to unnatural sound. The be-all and end-all for successful post-production is therefore careful and good recordings.
Ultraschall AMP (Automated Mixing Pipeline)
The Automated Mixing Pipeline is an uncomplicated and free alternative to online audio enhancement services like Auphonic. With the sensible presets you will achieve a great sounding result in most cases - without any audio experience or "golden ears". However, ultraschall also gives you enough possibilities to fine-tune according to your individual situation.
In the 'Podcast' menu under 'Workflows' -> 'Ultraschall AMP - Automated Mixing Pipeline' you will find the individual steps. The greyed out menu entries are only intended to help you think; you must work through the steps mentioned there "manually". Omitting steps or changing the order will lead to bad results, so go through the workflow strictly in order.
Ultraschall AMP - Automated Mixing Pipeline](https://raw.githubusercontent.com/Ultraschall/ultraschall-manual/main/assets/images/Post-Produktion/amp-menu-entry.png "Ultraschall AMP - Automated Mixing Pipeline") Ultraschall AMP: _The Automated Mixing Pipeline simplifies many complex post-production steps for you.
The individual steps of the AMP are in order:
Step 1: Select all items for mixing: Select all items on all tracks in the timeline area [25] that you want to enhance through the mixing pipeline. In most cases, this will be all the items (remember: items are the individual blocks on your tracks) in your project - to do this, click anywhere in the track area [23] and select Cmd/Ctrl + A to select them all. Alternatively, select Item> Select all from the menu.
The AMP is designed for voice tracks. Tracks with recordings (especially music) should not run through the AMP, but be mixed in at the end by ear.
To quickly select all items in a track, double-click on the grey area above or below the track name.
Step 2: Normalize loudness of selected items to -23 LUFS: Select this step directly in the menu Podcast>Workflows>Ultraschall AMP - Automated Mixing Pipeline. Ultraschall normalises all items selected in step 1 to -23 LUFS automatically. This is too quiet for actual publication, but the perfect basis for the following steps. The keyboard shortcut for this is Shift + Alt + N.
Step 3: Select tracks for the AMP: Now select all tracks in the track area [23] that are to be considered in the mixing pipeline. To select individual tracks, simply click in the grey area above or below the track name field. To select multiple tracks, hold down the Cmd/Ctrl key while clicking.
Step 4: Set AMP (Automated Mixing Pipeline) FX on selected tracks: You also select this step directly in the menu 'Podcast' -> 'Workflows' -> 'Ultraschall AMP - Automated Mixing Pipeline'. Then you should find an activated "JS: Ultraschall Dynamics (Ultraschall)" effect on each of the pre-selected tracks. This will equalise the loudness of your tracks to -20 LUFS.
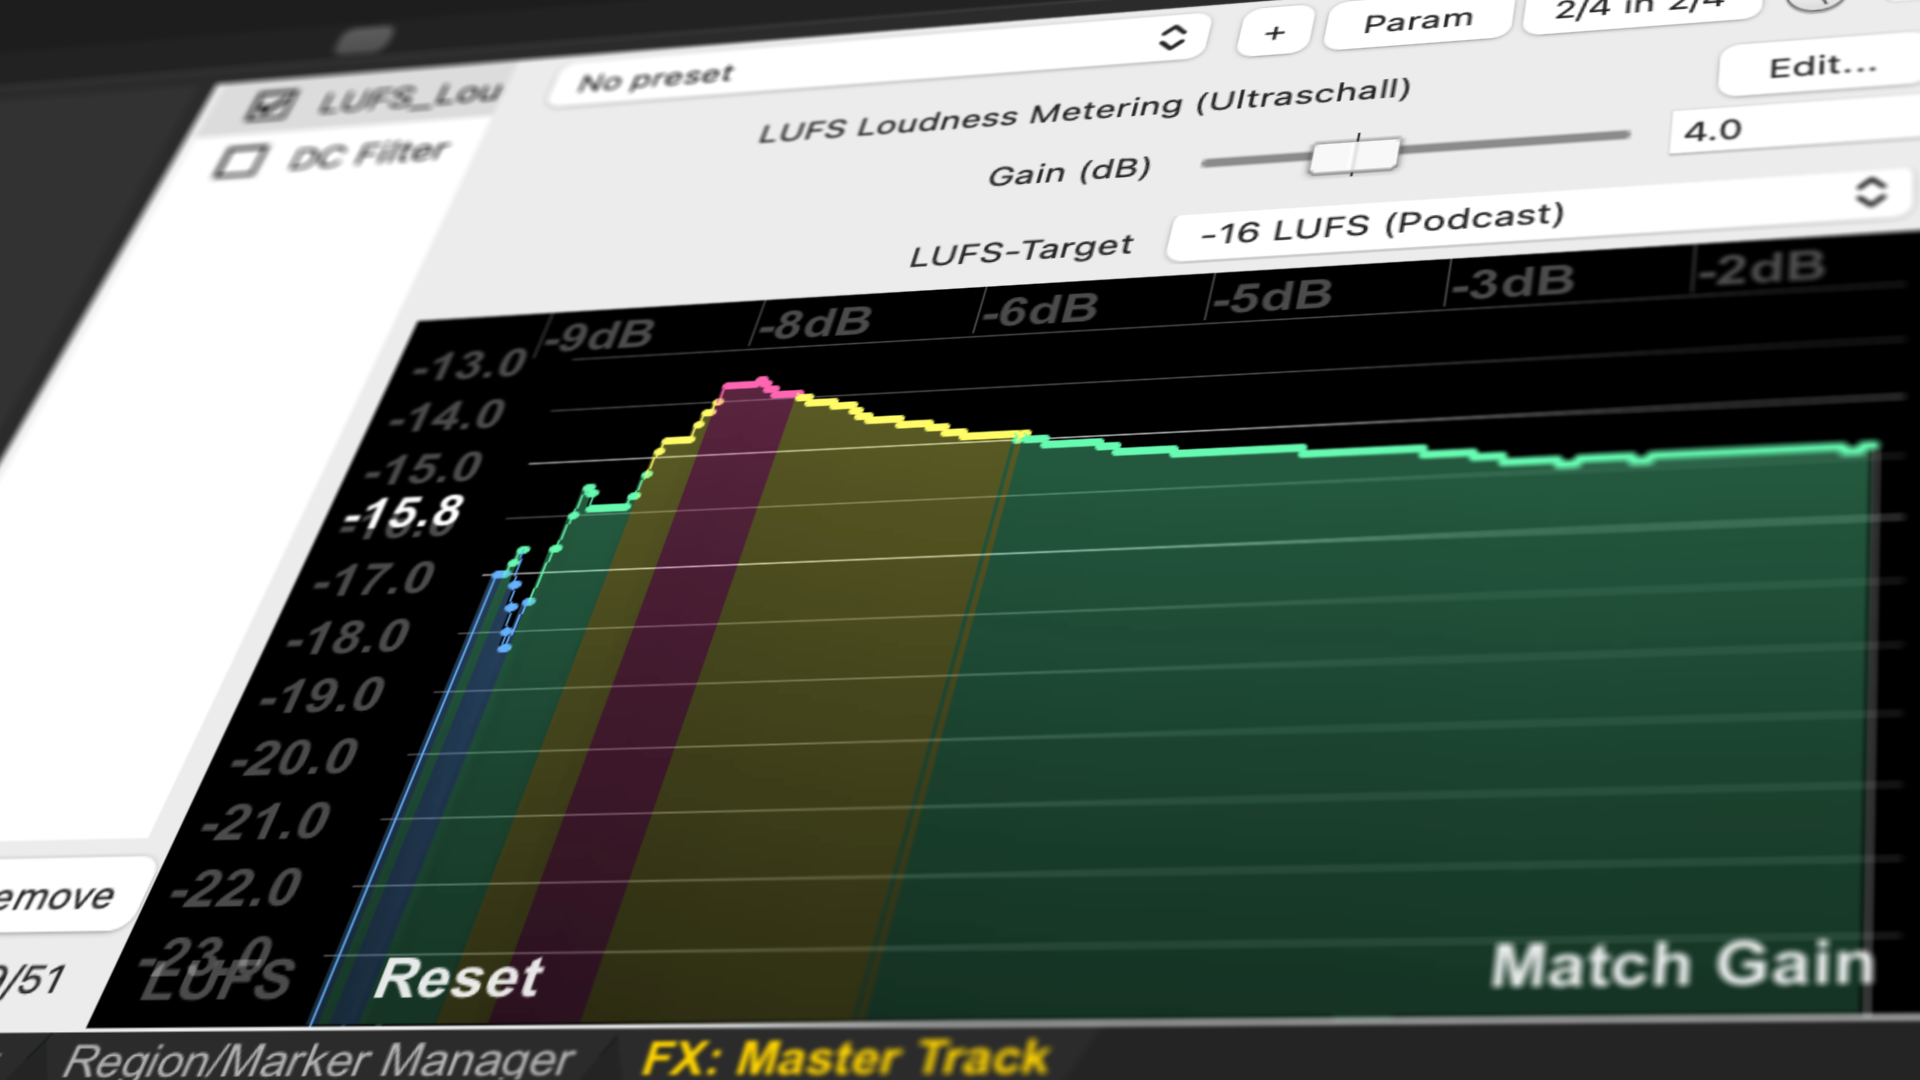
Step 5: Choose LUFS Target on Master FX (16 LUFS for Podcasting): In the previous step, the master track is raised to the usual -16 LUFS for podcasting by means of a track effect. You can also change this target value; you will find the corresponding setting in the FX area of the master track.
Correction possibilities
If the final result does not sound convincing, the signal-to-noise ratio of individual tracks is probably problematic - i.e. noise or reverb is amplified instead of reduced. You can fix this for each track individually by moving the respective 'noise floor' slider - until the voice remains loud, but noise disappears:
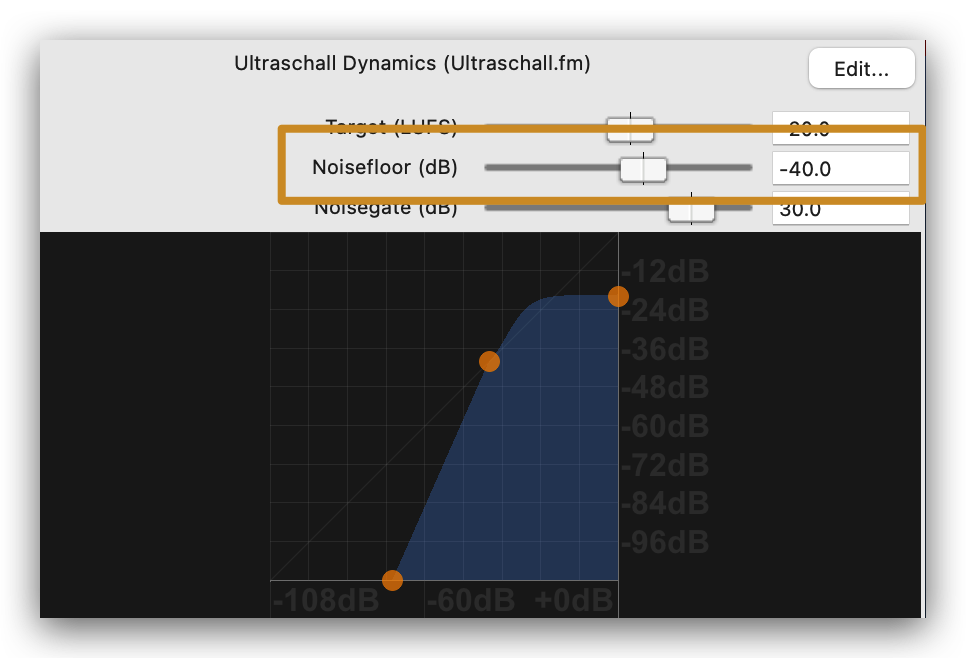 Ultraschall Dynamics - Noisefloor: The noise floor determines the signal-to-noise ratio of the associated track.
The exact procedure of the AMP is shown in this video.
Remark: This video is in German. Please do not forget to turn on auto-generated subtitles.
Post-Production for Advanced
Normalise
Technology excursion
Normalisation is the term used in audio engineering to describe the process of increasing or decreasing the amplitude of analogue or digital audio material at a constant gain, so that the result is within a specified range.
Loudness can be measured objectively. The unit of measurement for this is "decibel", the unit symbol "dB". The problem is that even if the volume is measured the same, different sounds are perceived differently; therefore, the signal is weighted and the unit "dbA" is used. For this purpose, the sound pressure level is weighted according to the perception of hearing - see also Wikipedia.
However, this (weighted) subjective quantity does not always provide sufficient information; therefore, LUFS. ("Loudness Units relative to Full Scale") has become the accepted unit of measurement. It quantifies a standardised measurement of loudness.
To determine the loudness in LUFS, the human perception and the electrical signal intensity are added together. The only difference between the LUFS and the previously used RMS method is that in loudness according to RMS the entire frequency range is considered equally, but in LUFS the individual frequencies are weighted individually.
Depending on the intended use, different LUFS values are useful. In broadcasting, for example, -23 LUFS has become the standard. However, because this often seems too quiet for podcasts, many podcasters produce at a target value of -16 LUFS. Ultraschall is also set to -16 LUFS as the target value for the final rendered audio file. The LUFS values previously used in the recording chain should always be lower than this.
Normalisation with the Ultraschall Dynamics 2 effect
The Ultraschall Dynamics 2 effect allows the average volume of all audio tracks to be raised to the -16 LUFS (or other value) recommended for podcasts.
How do you activate the effect if it does not appear in the effect area of the desired track?
For all newly created tracks, the effect should already be set up as described above, but not yet activated. In this case, you simply add it manually: Select the 'Add' button at the bottom of the effect window. The window that appears lists all the effects available in REAPER/Ultraschall. On the left, we have marked some effects that are useful for podcasts as 'favourites'. Click on this menu item, select the JS: Ultraschall Dynamics effect on the right and confirm with OK - the effect (already activated) lands on the selected track.
Here is a video explanation
 Ultraschall Dynamics:** This is how you activate an effect on an audio track.
Settings for normalisation
To normalise all sources in your recording to -23 LUFS, simply select all items and choose 'Workflows' > 'Ultraschall AMP - Automated Mixing Pipeline' > 'Step 2: Normalise loudness of selected items to -23 LUFS' from the 'Podcast' menu.
Alternatively, or to use a target value other than -23 LUFS, change the corresponding slider Target (LUFS) in the effect plug-in JS: Ultraschall Dynamics (Ultraschall.fm). For most cases, however, the preset value is ideal.
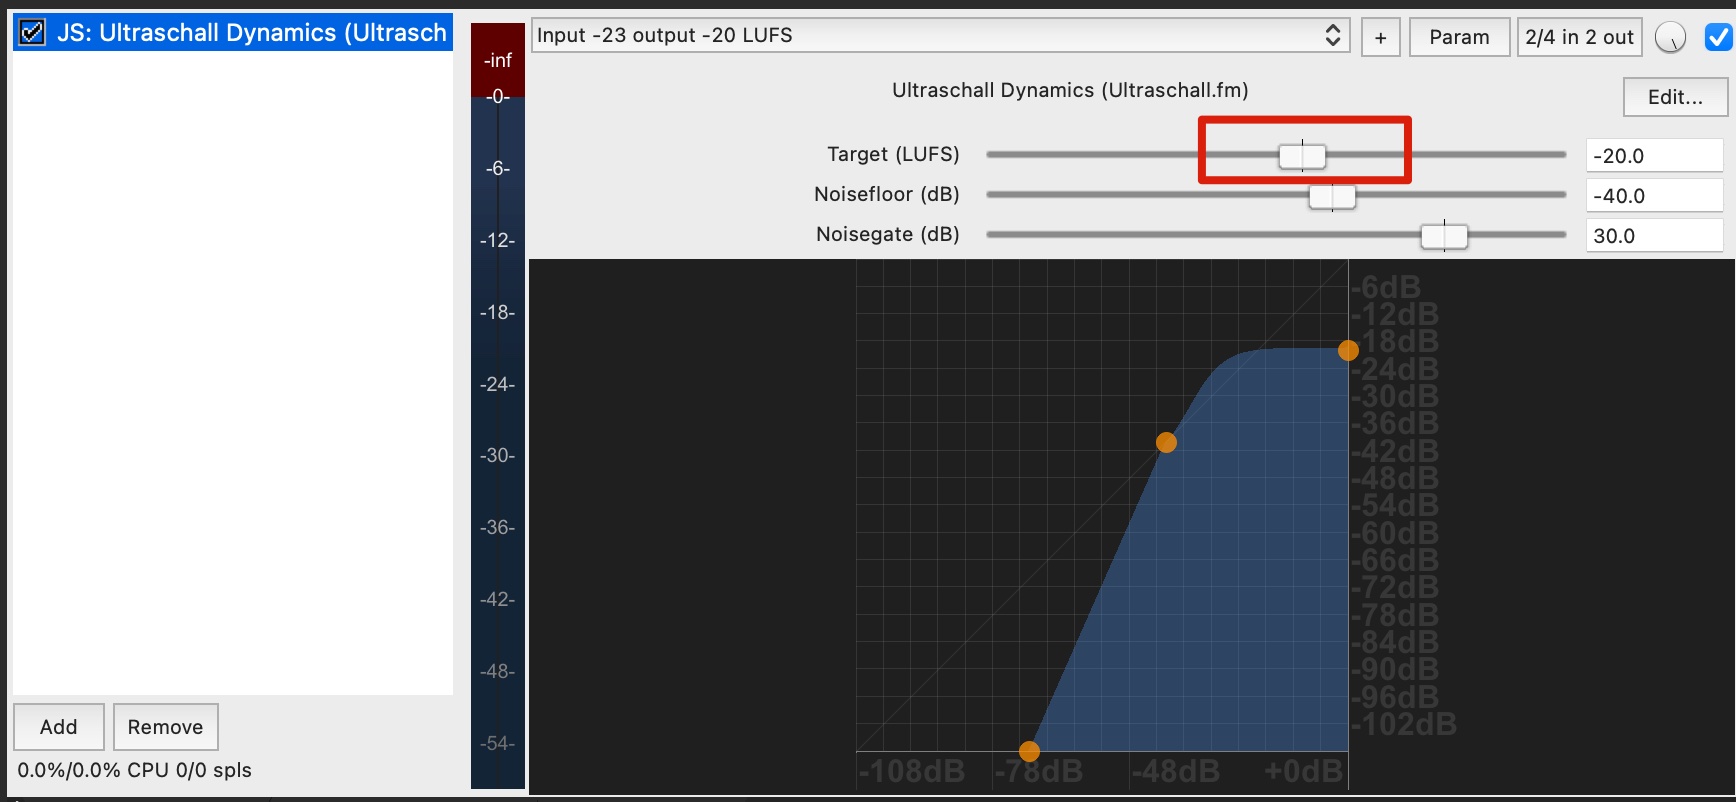 Ultraschall Dynamics: Here you can set an individual value for the LUFS of your selected audio track.
You make the setting for the normalisation of the final audio mix via the effect plug-in 'JS: LUFS_Loudness_Meter' on the master track.
 Ultraschall Dynamics: Also in most cases it is not necessary to change the settings.
Remove noise with the Ultraschall Dynamics 2_ effect
The Ultraschall Dynamics 2 effect includes, among other things, an adjustable soft noise gate - which helps you to separate noise and speech on your tracks.
The 'Noise floor' control has the greatest influence on the volume: Here you determine the limit above which a signal is treated as content to be amplified or as noise or interference signal to be attenuated. The trick is to find the exact setting for each track at which even soft speech is still amplified, but noise and breathing (like Darth Vader) are lowered. The suggested value usually fits a good headset such as the DT297 or the HMC660, which were conservatively modulated during recording (in a range of -6 to -12 dB). However, this is only a starting point; it is almost always worthwhile to fine-tune here.
To do this, proceed as follows: You look for a passage in the track in question that contains silence (possibly with hissing and breathing) as well as quiet and normal loud speech. This may not always be easy to find, but you don't need more than a passage of perhaps 30 seconds for a good result. Over this section you set a time selection with the selection tool, switch to 'repeat' mode and the track to 'solo' so that the passage is only played on the desired track and in an endless loop. Now listen very carefully and start to move the slider back and forth a little - even a little more at first, so that you get a feeling for the change and the effect. Then tweak until you are satisfied with the result.
However, this only works if you did not turn the gain control during the recording. If you changed the input level during the recording - and recorded very softly at the beginning, for example, and then rather loudly later - the mixing becomes a little more complicated. Either split the track at the appropriate point into two tracks, each with individual effect settings, or use an automatic sound enhancement service such as Auphonic.
Here is also a video on this:
 Ultraschall Dynamics: This is how you change the threshold for noise reduction).