Recording
Introduction
Now the actual recording can begin. In this chapter you will learn how to create tracks, select your audio sources and then start recording.
There is a very good tutorial video on this topic.
Create new project
REAPER always opens the last edited project when it is started. If REAPER does not find a last project, REAPER opens a new, empty project. You can save this project via the menu File>Save project or with Cmd/Ctrl + S. If you record something before you have saved the project, the audio files are stored in the folder 'Documents/REAPER Media' on your hard disk. You can create a new project via File>New Project or Cmd/Ctrl + N.
You should always save your project before recording; this saves you data chaos afterwards. The Soundcheck helps you not to forget this.
Project templates
To avoid having to create and configure a project every time you record, you can set up a project once and then save it as a template via File>Project Templates>Save project as template. You can open this template before each new recording via File>Project Templates>$NAME_of_the_template.
Create tracks
In order to conveniently edit all speakers, music and, for example, sound effects later, you create a separate track for each audio source in the Tracks [23] area. In Ultraschall there are essentially three types of tracks:
- Track** - for example for a local speaker
- StudioLink Track - for example, for an interview guest that you connect via the Internet using StudioLink (see also below "Recording with StudioLink")
- Ultraschall Soundboard Track** - for recordings that you play back via the soundboard during the recording (see also below "Use the soundboard").
Regular tracks, to which you assign individual speakers or tracks of your multi-track recorder (such as Zoom H6) in the next step, are created either by double-clicking in the track area [23] area, with the keyboard command Cmd/Ctrl + T or with a right-click in the track area [23] and then a click on Insert new track
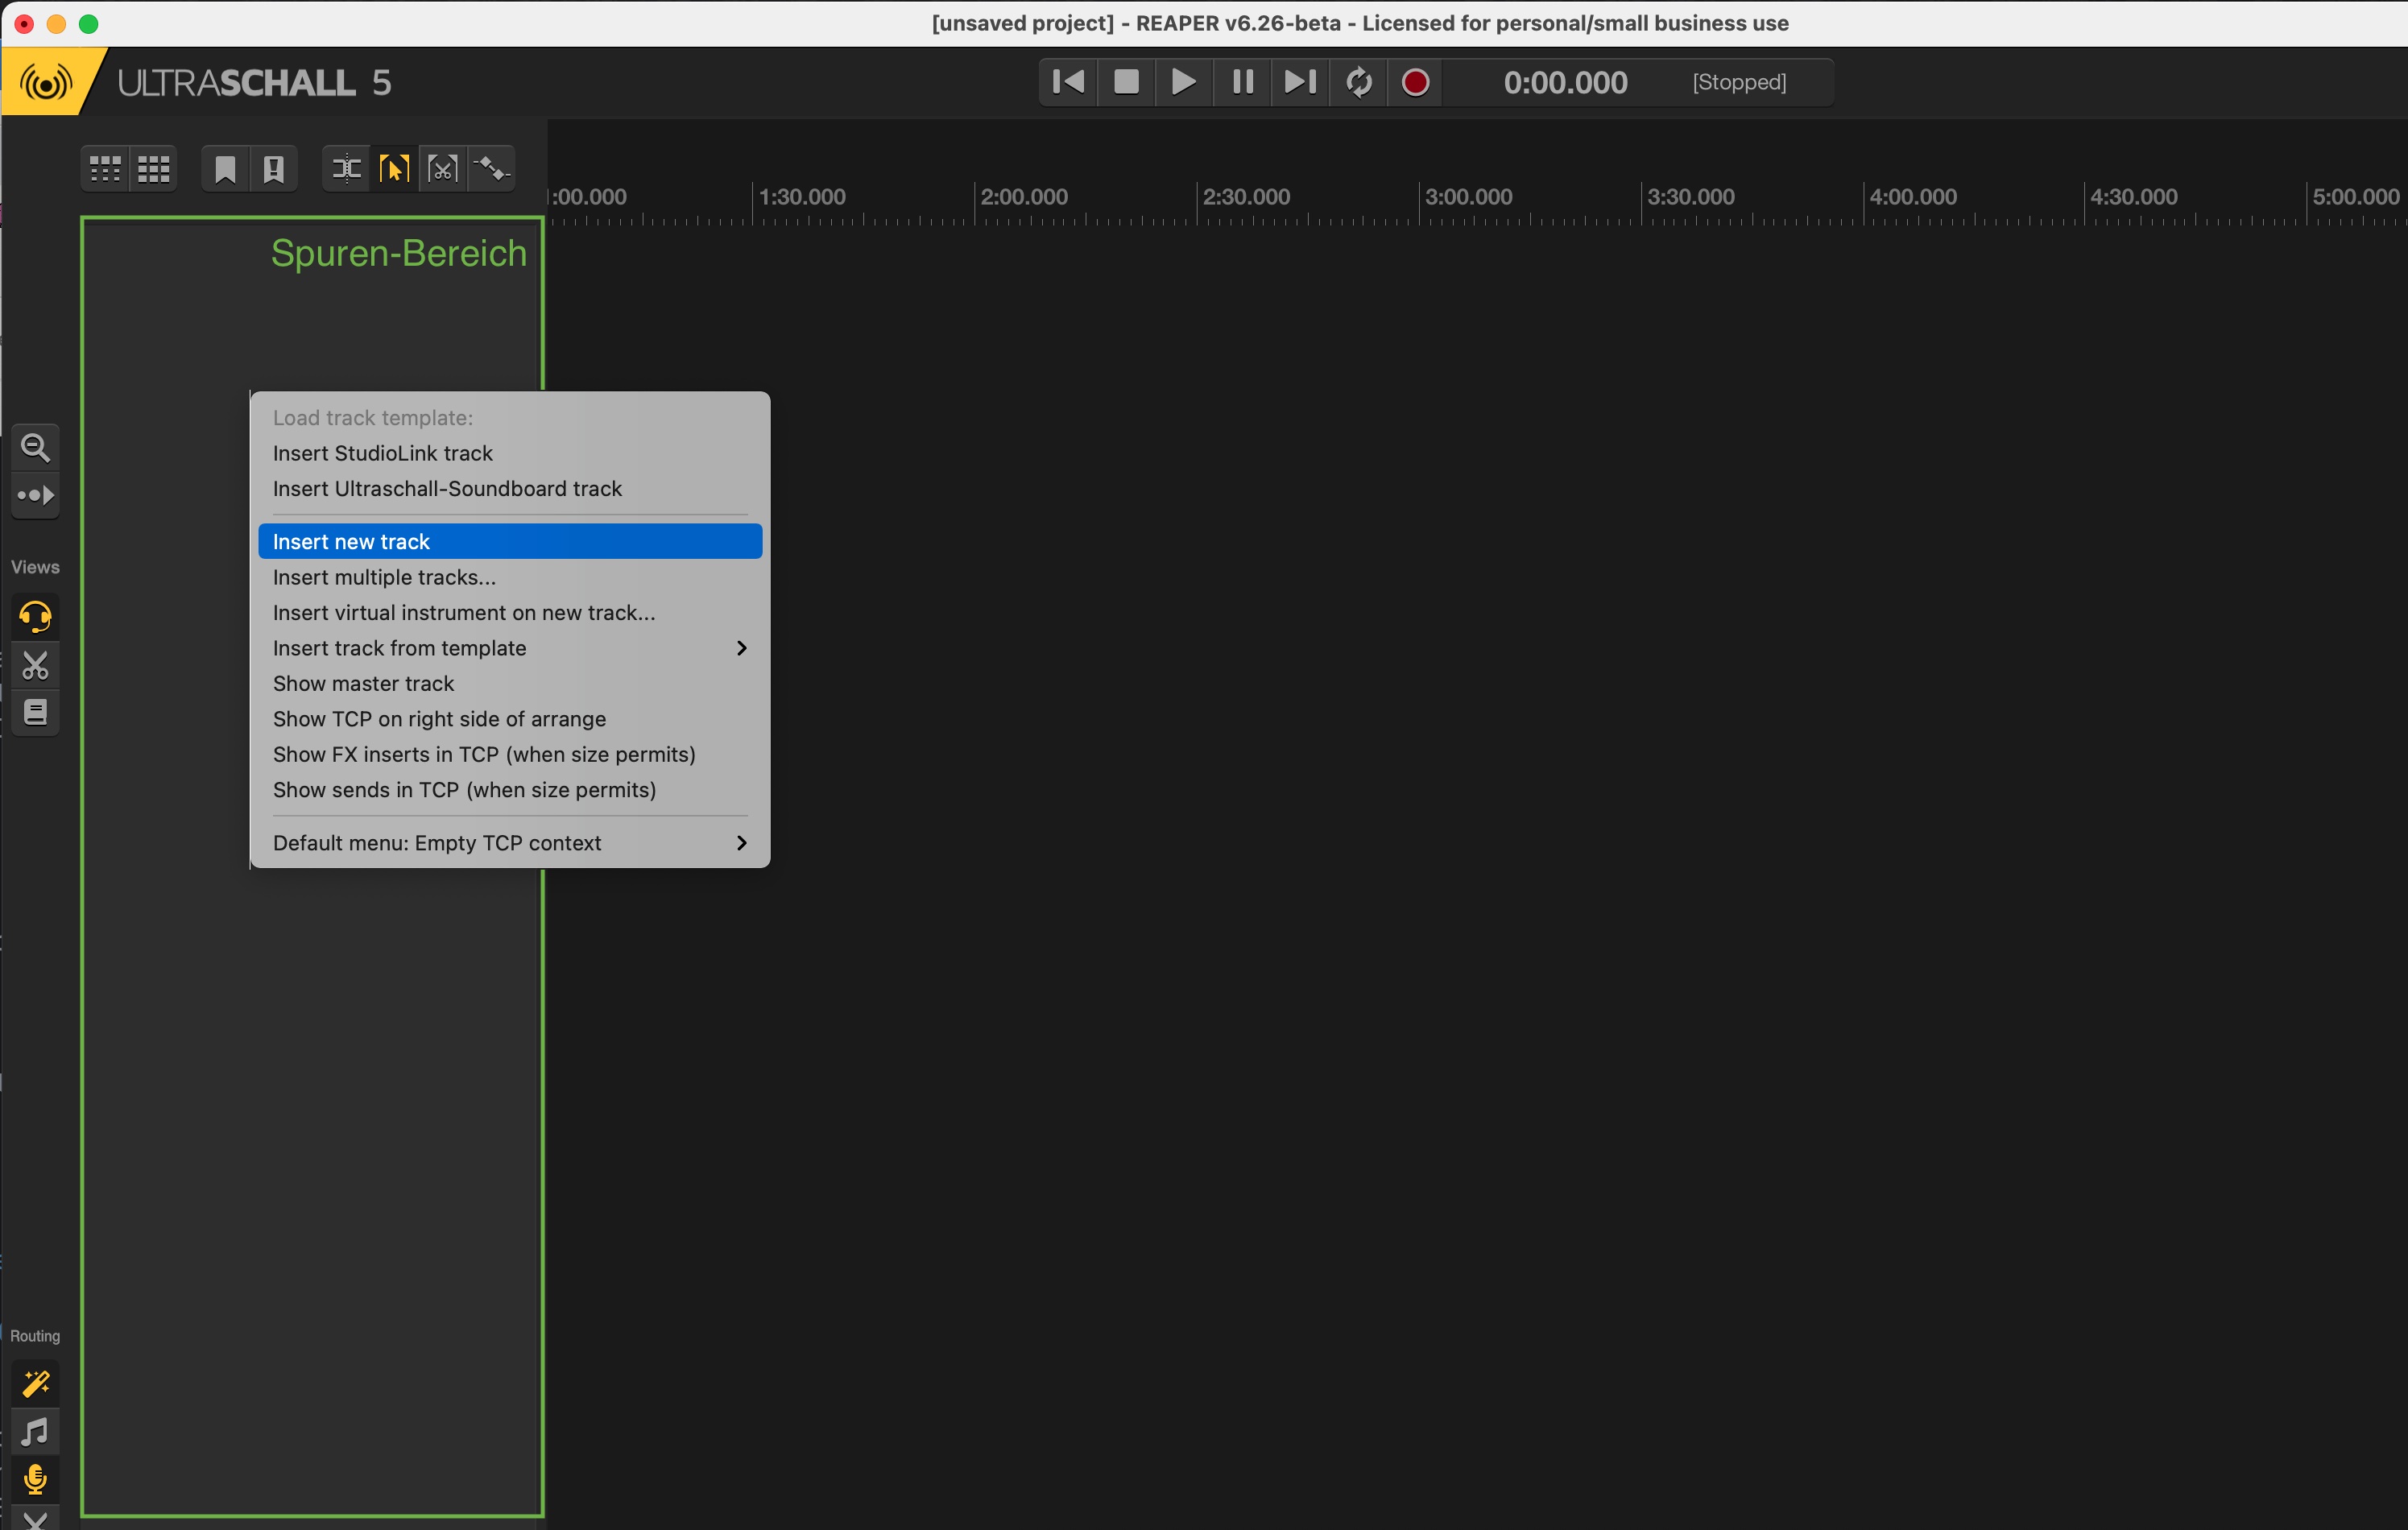 Insert new track: Inserting new tracks enables the recording of the individual audio tracks.
With a click in the still empty, but already coloured area, it is best to directly assign a name to your track - this way you will not lose the overview even in larger projects.
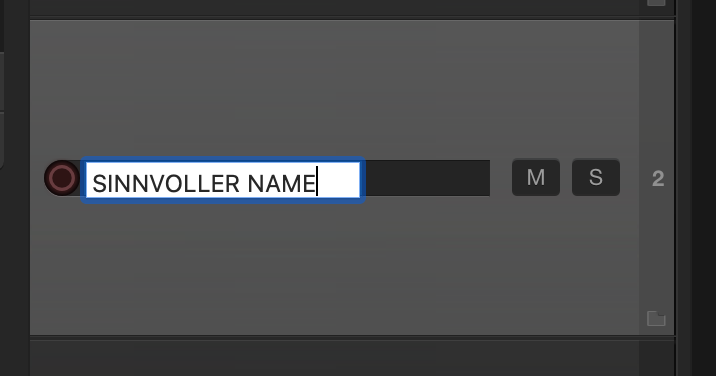
Name track: Set meaningful names(SINNVOLLER NAME) for your tracks, this will make it easier for you to assign them later.
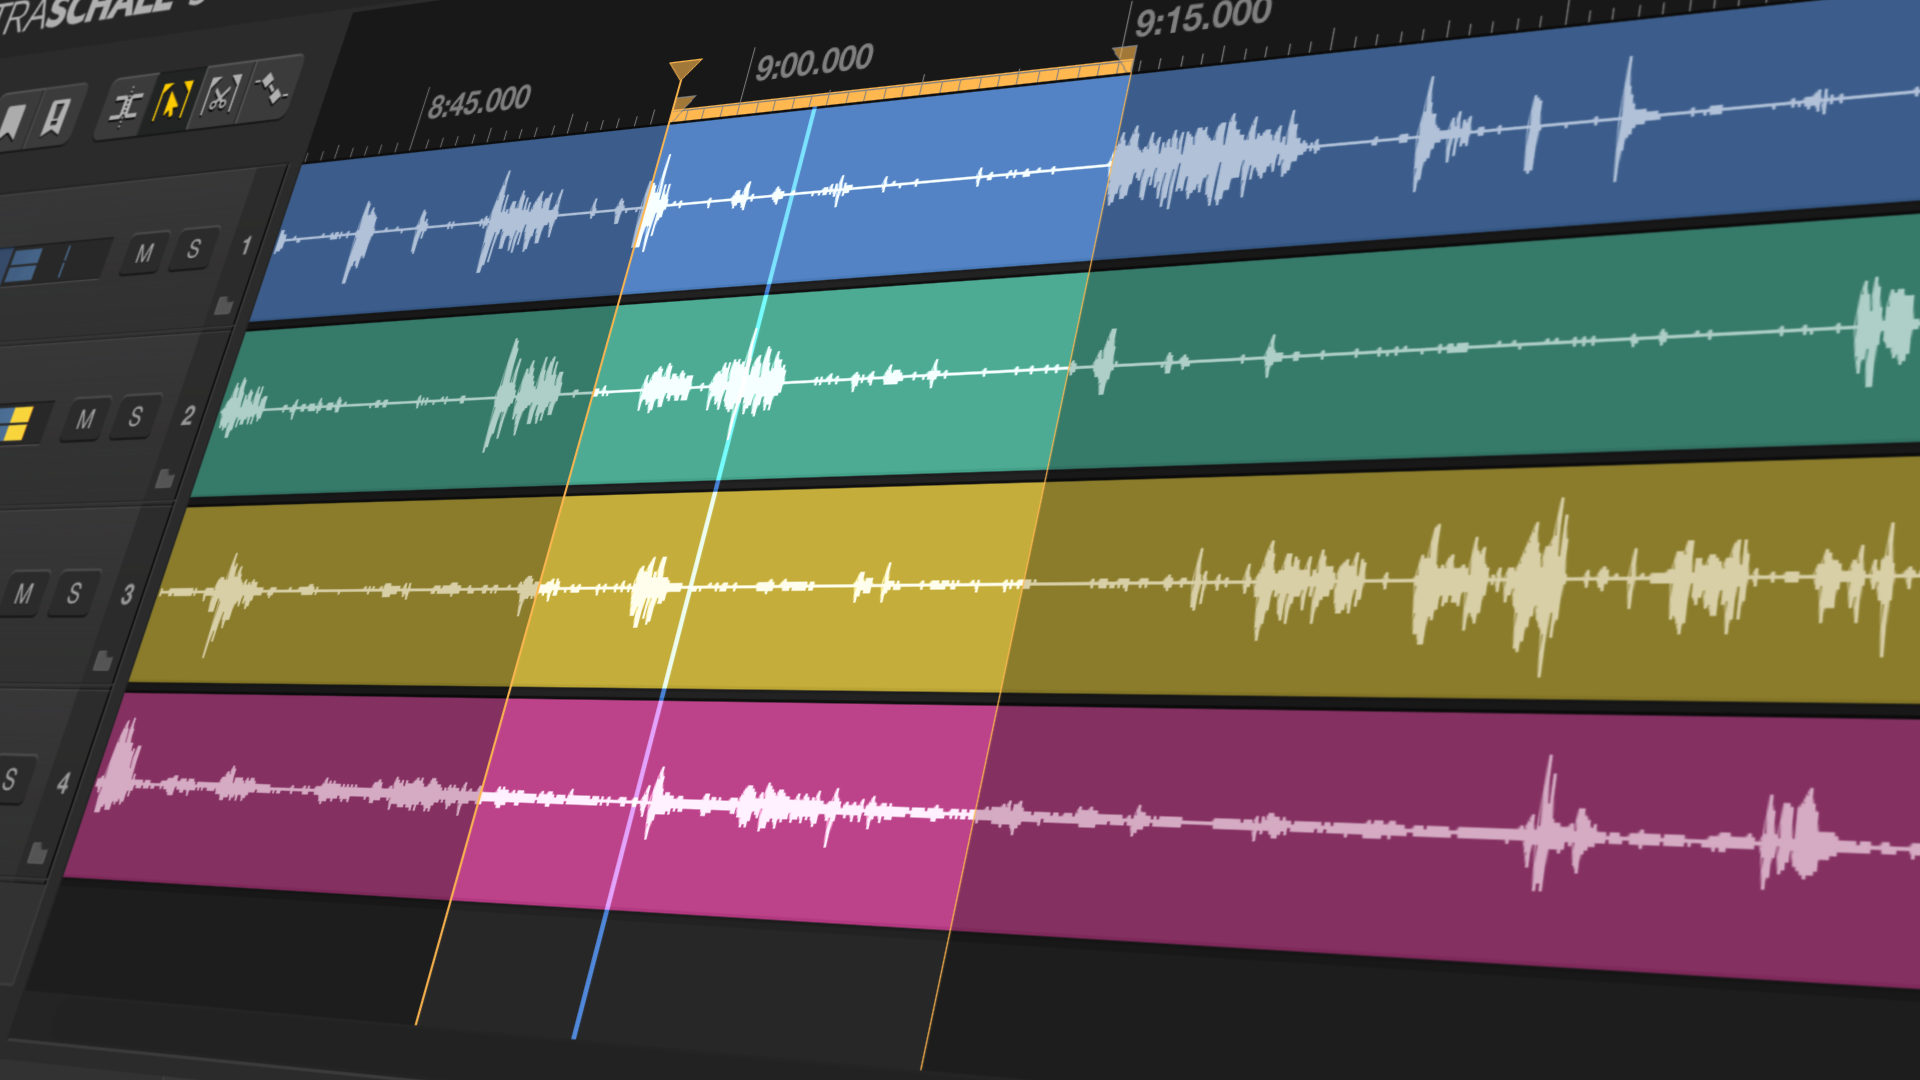
Since version 5 of Ultraschall, tracks are not only automatically adjusted in height to the size of the window, but also automatically coloured for clarity. If you right-click on the track (or use the keyboard shortcut Alt + C with the track selected), you can change the colour in the colour picker afterwards.
 Example project: This is what a project with two speakers, a StudioLink track and a soundboard looks like.
The whole thing again as a video explanation:
Remark: This video is in German. Please do not forget to turn on auto-generated subtitles.
Select inputs
Select Audio Device
The audio device (typically a microphone or an audio interface) with which the recording is to be made is selected via the menu REAPER>Preferences (or Cmd + ,). There you will find Audio>Device the field Audio Device. In this example it is a Zoom H6.
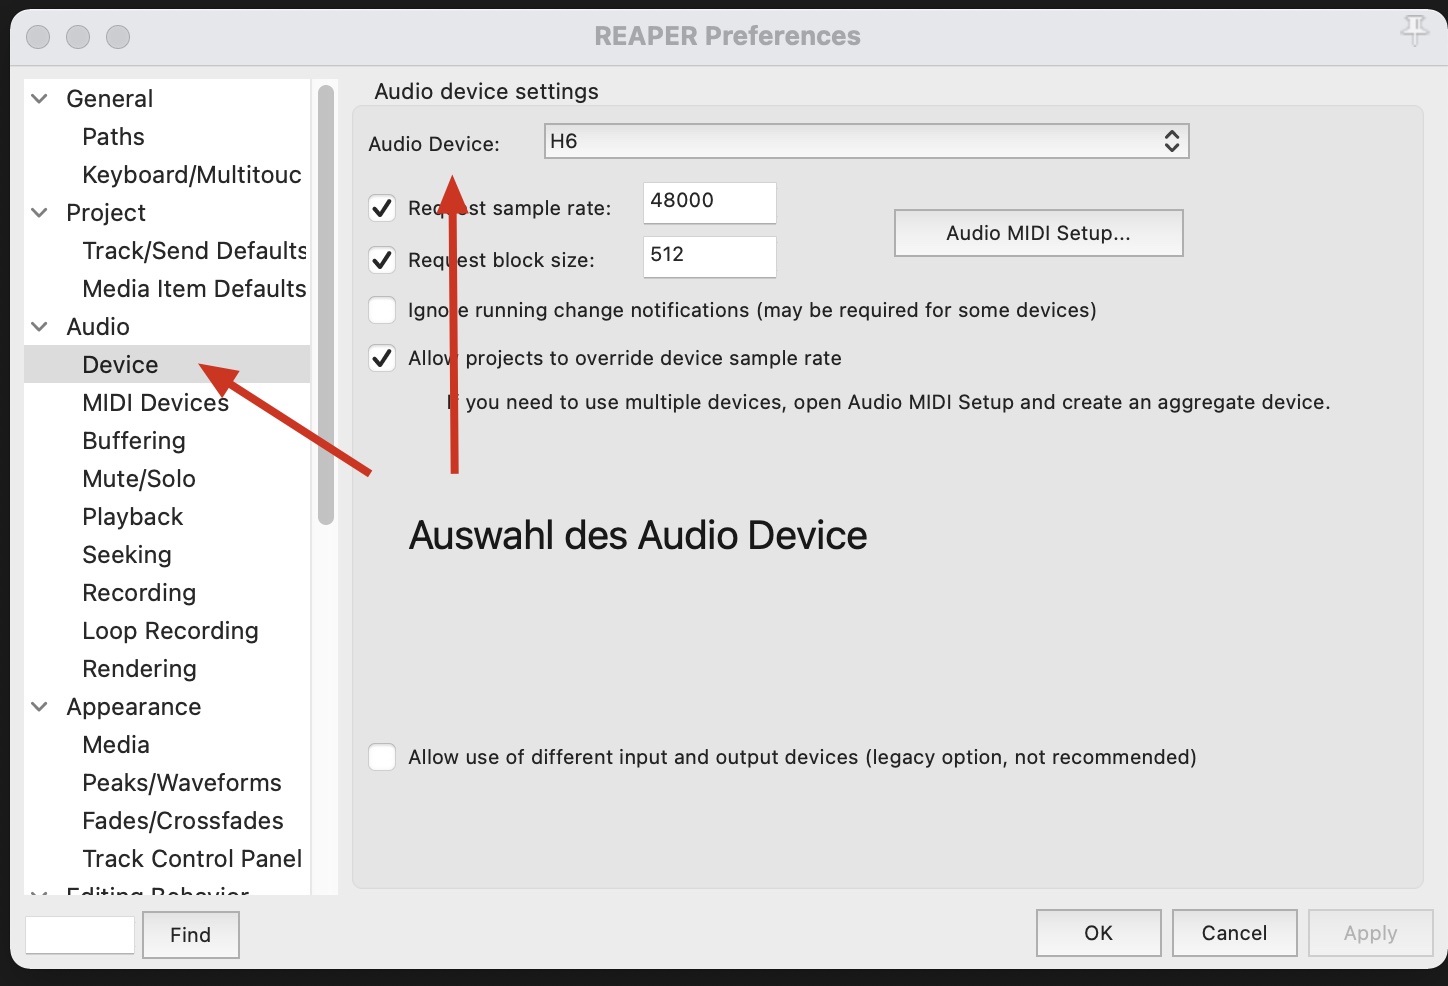 Select audio device: In the settings you can select your audio device.
An audio device can have several inputs (but it does not have to), which can be assigned to different tracks. If we stick to our example with a Zoom H6, we have four (plus two) inputs available here. You can record with four - or with a corresponding extension with six - microphones at the same time.
The way the inputs are counted is device-specific, so in Ultraschall the channel designation may be different from the one given on your device (for example, channel 1 on the Zoom H6 is listed as channel 3 in Ultraschall).
Select and assign tracks
All speakers, all those connected via StudioLink and the sound effects (in the soundboard) now each have their own track. The next step is to assign these tracks to the recording channels - that is to the various microphones attached to your recording device.
All tracks that you have created in the main window of Ultraschall can also be found in the Mixer area [24]. The assignment is made via the track names, the displayed track numbers or the sorting (in the track area [23] from top to bottom, which corresponds to a sorting from left to right in the mixer area [24]):
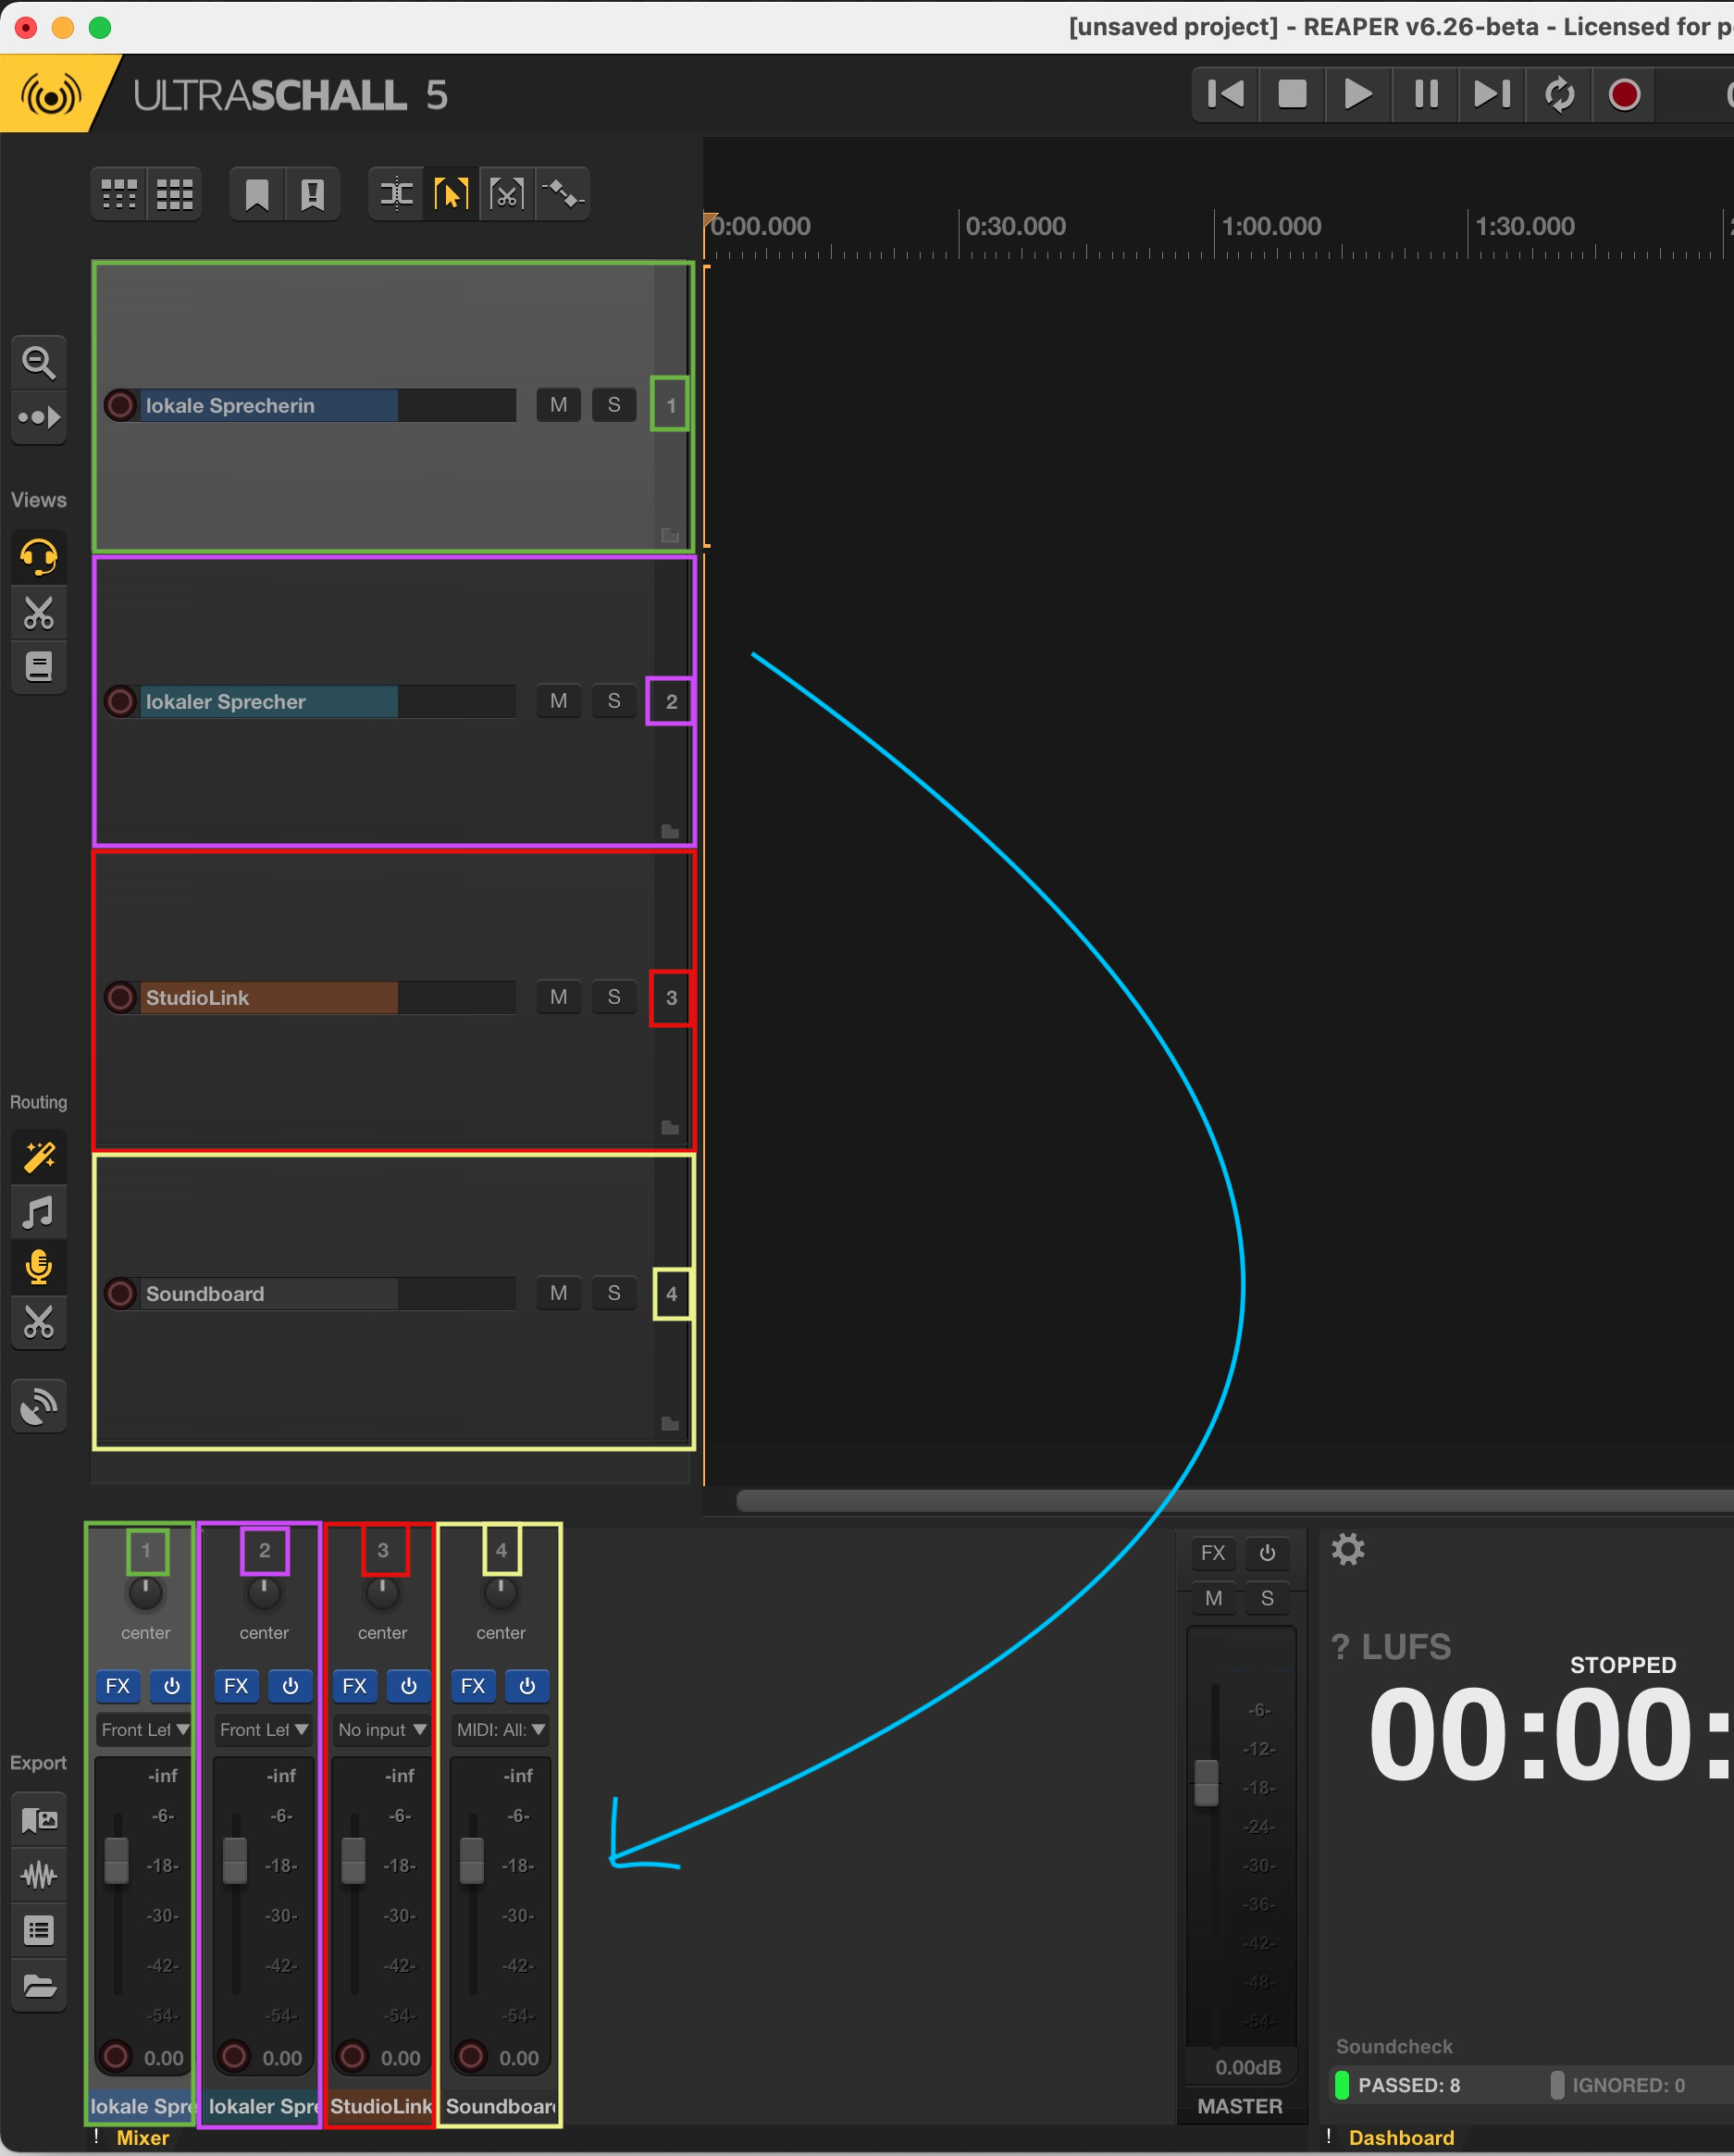 Tracks and mixers: Each track has its own mixer.
Ultraschall tries to assign all tracks and recording channels automatically. However, if you notice that the voices do not land correctly on the tracks named in step "Create tracks, you can make the assignments manually in the Mixer [24] via the corresponding 'Input' drop-down menus. It is best to get into the habit of briefly checking all local microphone tracks before recording - the StudioLink and Soundboard tracks are always automatically assigned correctly, they do not need a physical input and remain set to Input: None.
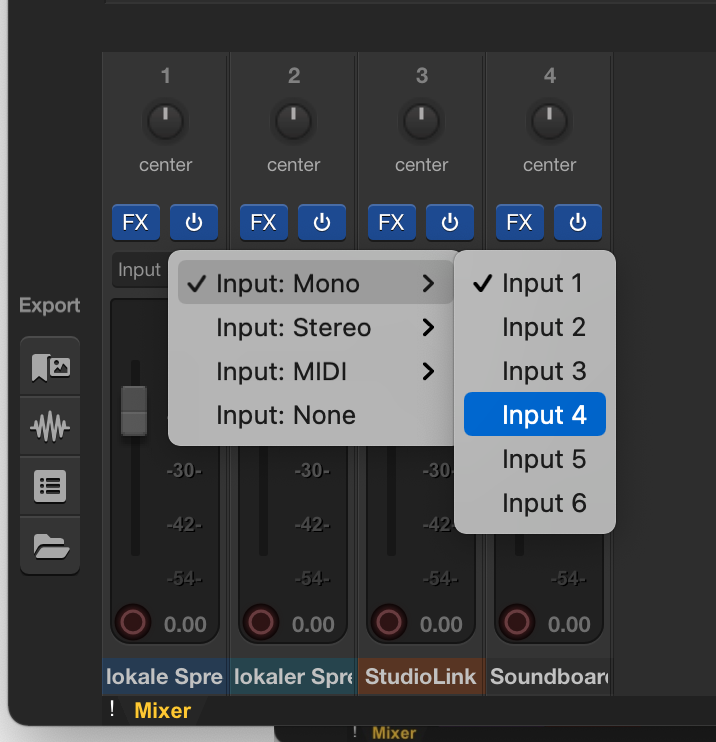
Assign inputs: Use the drop-down menu to select the input.
The same explaination in a video.
Remark: This video is in German. Please do not forget to turn on auto-generated subtitles.
Remark: This video is in German. Please do not forget to turn on auto-generated subtitles.
Routing
The routing serves to ensure that the respective participants can hear each other - and also that any soundboard that may be present can be heard by all (also via an internet connection using StudioLink).
Magic Routing
Since version 5, Ultraschall has a so-called magic routing that completely relieves you of manual routing. Ultraschall automatically recognises whether you are cutting or recording and switches the routing accordingly. On the left side of the screen you will find the routing buttons [14-18] for the following routing settings:
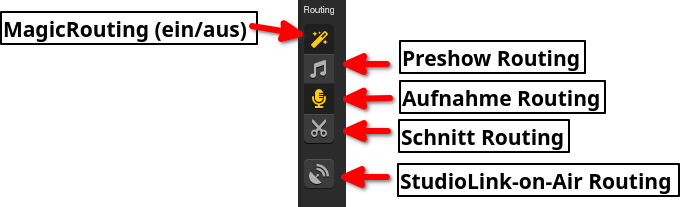
- Magic Routing (on/off)** [14]: If this is switched on, Ultraschall automatically takes care of the correct routing. You don't have to do anything else.
- Preshow Routing** [15]: If you stream your podcast recording live via StudioLink-on-Air, you can set this in such a way that your soundboard can already be heard in the stream, but no speakers can be heard yet.
- Recording-Routing [16]: This is the setting for the actual recording of your podcast.
- Editing routing [17]: This setting is for editing your recording.
- StudioLink-on-Air (on/off)** [18]: This button adjusts the routing for your StudioLink-on-Air stream.
Manual routing
If you prefer to set the routing manually, you can do this via the settings View>Routing Matrix or with Alt + R. The Routing Matrix [27] shows you an overview of which people can hear each other. You can change the assignment manually here, but since the introduction of Magic Routing we do not recommend it.
Video: From minute 49 onwards, the video below explains how routing was adjusted in older versions.
Remark: This video is in German. Please do not forget to turn on auto-generated subtitles.
Soundcheck
Soundcheck helps you avoid the most common mistakes when podcasting with Ultraschall. The sound check issues a warning when Ultraschall has detected a potential error. You can switch the individual components of the sound check on or off as required in the settings. The sound check checks in detail:
- Unsaved Project: Warns you when you want to record something but have not yet saved the project. This prevents data chaos.
- Prepare all tracks for editing: Warns you if you want to start editing after recording but the tracks are not yet prepared.
- Check for 48 KHz sample rate: If you want to use StudioLink or StudioLink-on-Air, you must use 48 KHz as the sample rate.
- Internal mic used (Check if internal mic is selected): Checks if you are accidentally using your laptop's internal mic to record instead of your good mic.
- Start recording only at the end: Prevents you from unintentionally recording in the middle of your project.
- Unknown sound interface: Checks if you have connected a new sound interface for which you have not yet made a direct monitoring setting.
- Echo and distortion prevention: If your interface does not have direct monitoring, you should select the correct block size. A block size of 128 samples leads to latency and echoes, a block size of 32 samples leads to instability. We recommend a block size of 512 samples for direct monitoring and 64 samples without direct monitoring.
- Input Wizard: Checks if you are assigning an input multiple times or if you are using an interchangeable input on a Zoom.
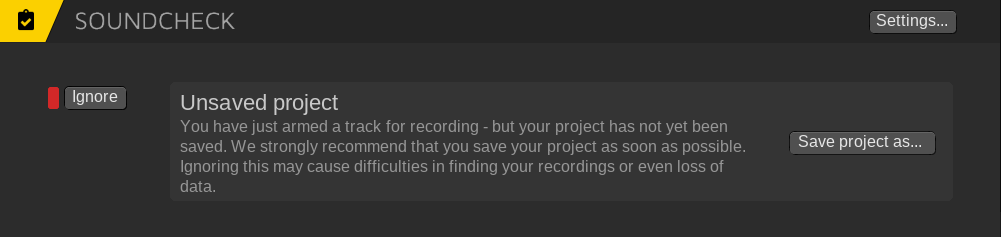 Soundcheck: This is what a sample soundcheck looks like in an unsecured project.
You can either ignore the warning messages on the left with the 'Ignore' button or correct the problem with the button on the right. In the middle, a text field explains the problem in more detail. If you close the sound check window without having fixed the problem, all warnings are automatically ignored. You can also press Esc to close it. In the dashboard (bottom, centre) you can see the status of your sound check at any time - a click on this sound check bar opens the sound check overview again.
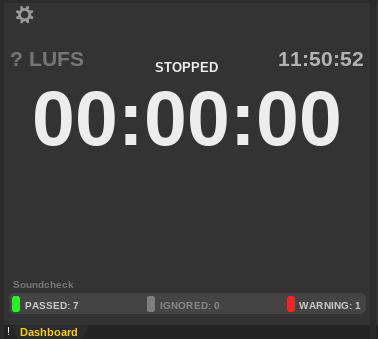 Dashboard: The dashboard with any warnings can be found in the soundcheck bar at the bottom of the window.
Recording with Studiolink
is a stand-alone software that allows you to remotely join another Ultraschall recording or integrate other people into your recording via the internet.
StudioLink is available in two versions: One is the Standalone version (for your guests) and the other is a Plugin (for you to record in Ultraschall). The StudioLink plug-in is pre-installed in Ultraschall. Updates of StudioLink always come together with Ultraschall updates. You can find detailed documentation on StudioLink itself here: StudioLink doc.
You insert a StudioLink track into your project via the menu 'Podcast' -> 'Insert StudioLink and Soundboard Tracks' -> 'Insert StudioLink track'. Alternatively, you can right-click in the Tracks section [23] and select the appropriate option.
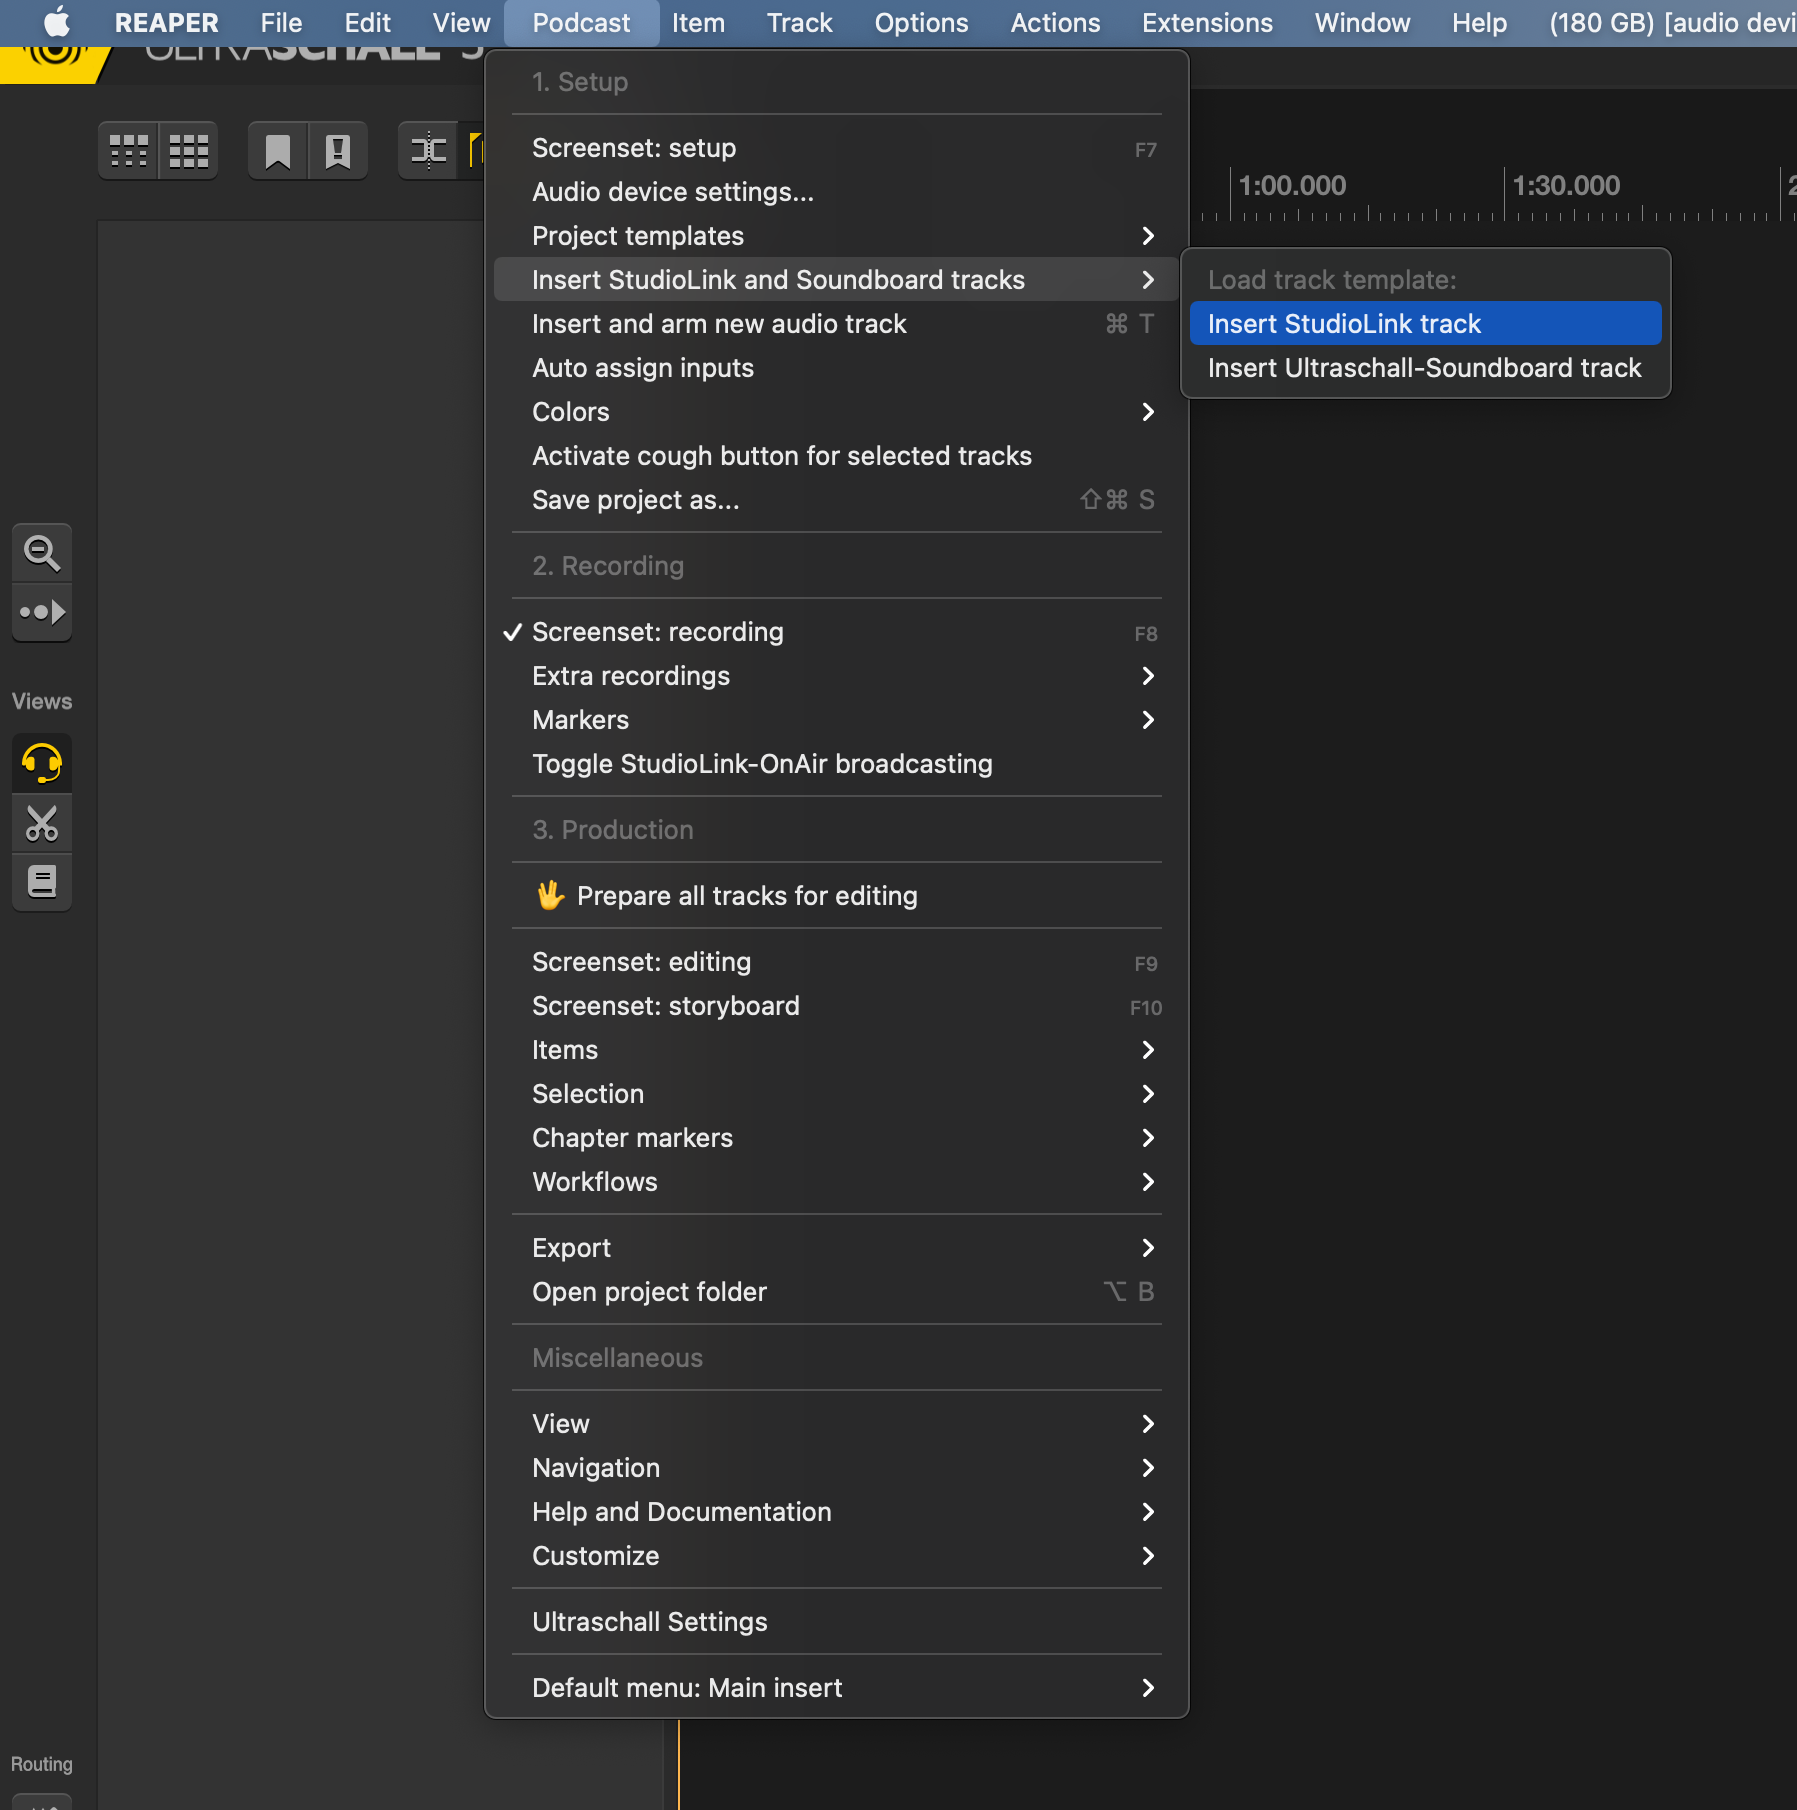 Screenshot: This is how you insert a StudioLink track via the menu.
The StudioLink tracks appear in Ultraschall as normal tracks in the Track Area [23] or in the Mixer Area [24]. At the same time, however, a browser window opens in your standard browser, through which the actual connection is established and later also terminated. If you are using Windows, you must not close the console window that also appears, otherwise you will not be able to establish a connection.
The browser window opens separately. (Please follow the instructions on StudioLink!)
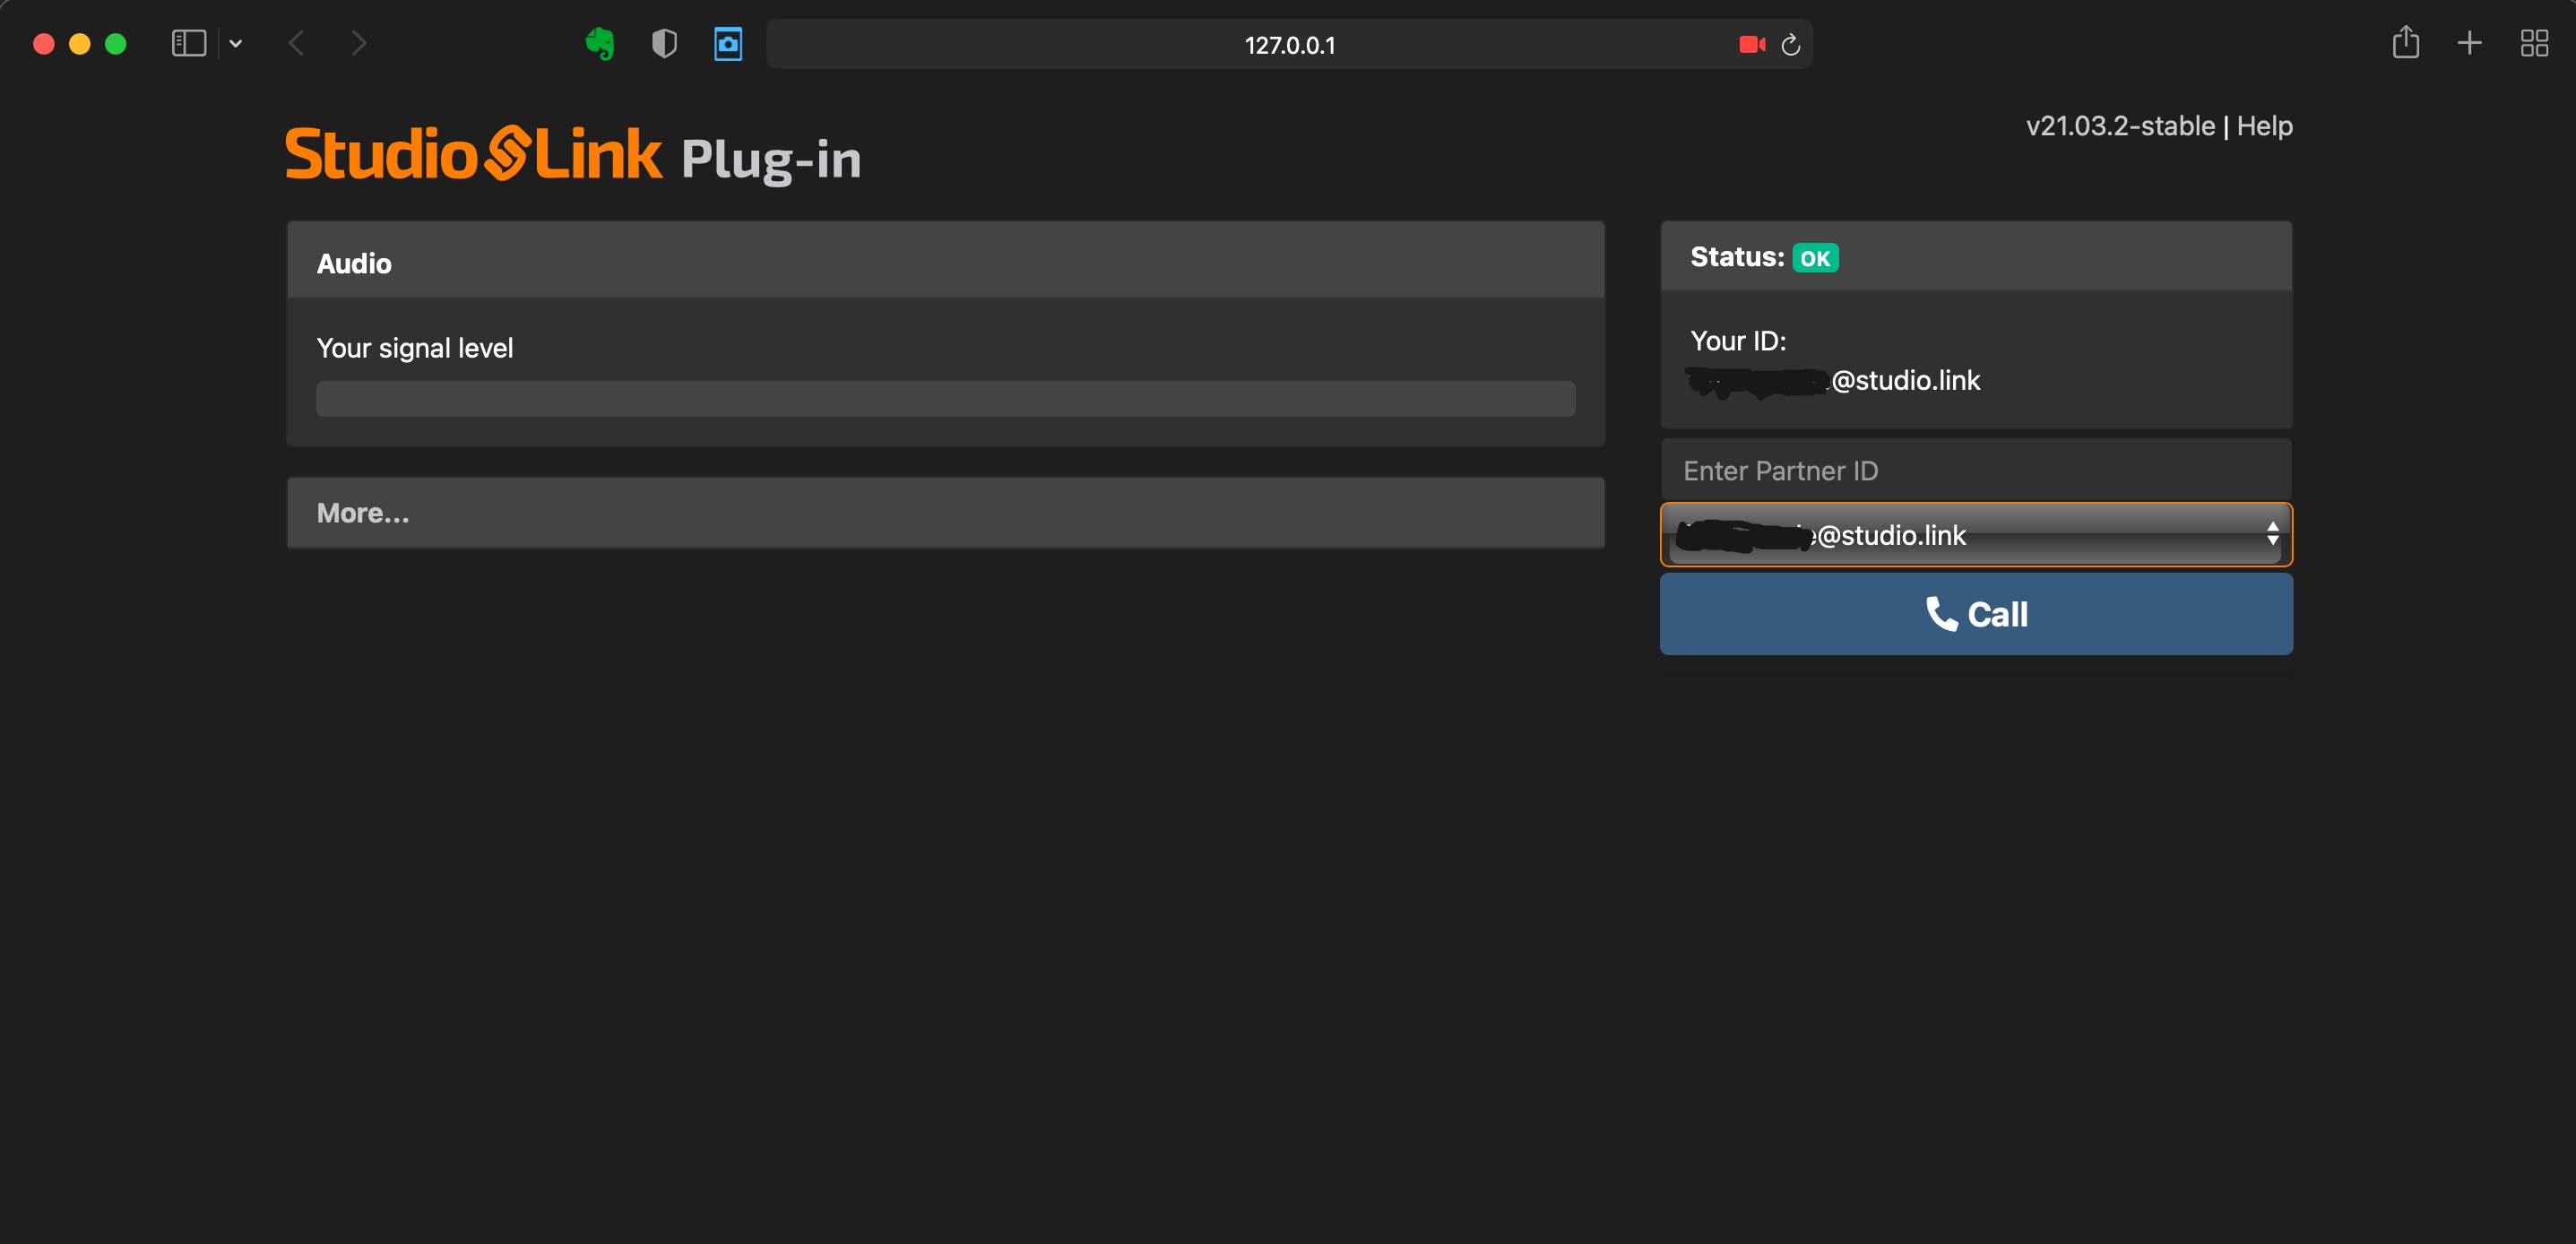 StudioLink: Studio-Link in the Browser.
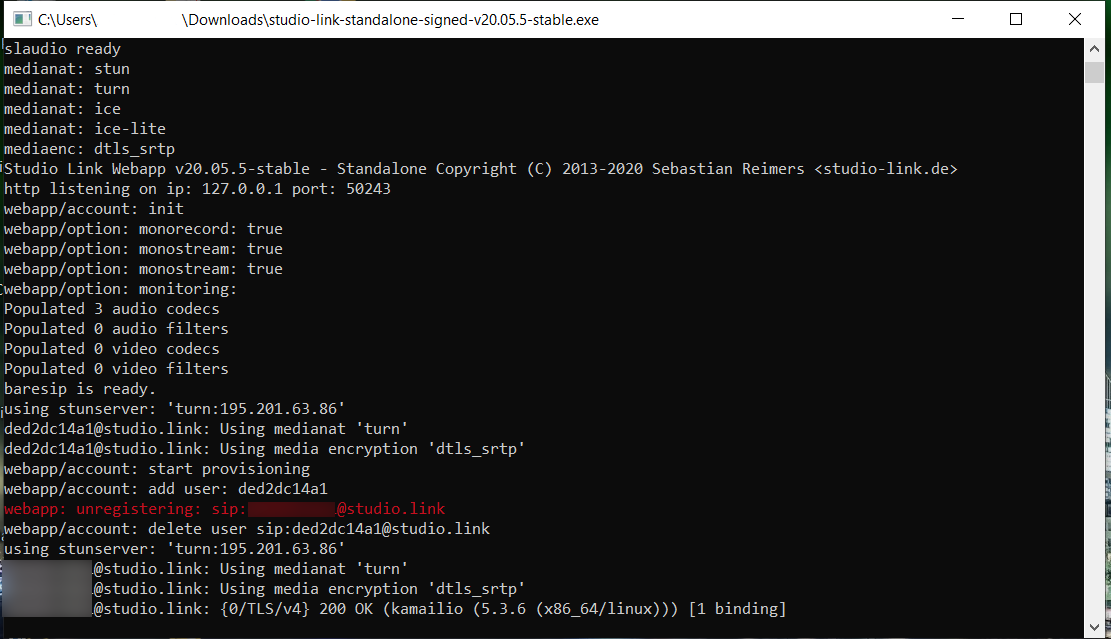 Windows Console: Please do not close this window or StuidoLink will not work!
Using the soundboard
Insert soundboard track
Ultraschall comes with its own soundboard, which you can use to insert music and sound effects during the recording, for example your intro, dividers or other audio snippets. You insert a soundboard track via the menu 'Podcast' -> 'Insert StudioLink and Soundboard tracks' -> 'Insert Ultraschall soundboard track'. Alternatively, you can right-click in the Tracks section [23] and select the appropriate option.
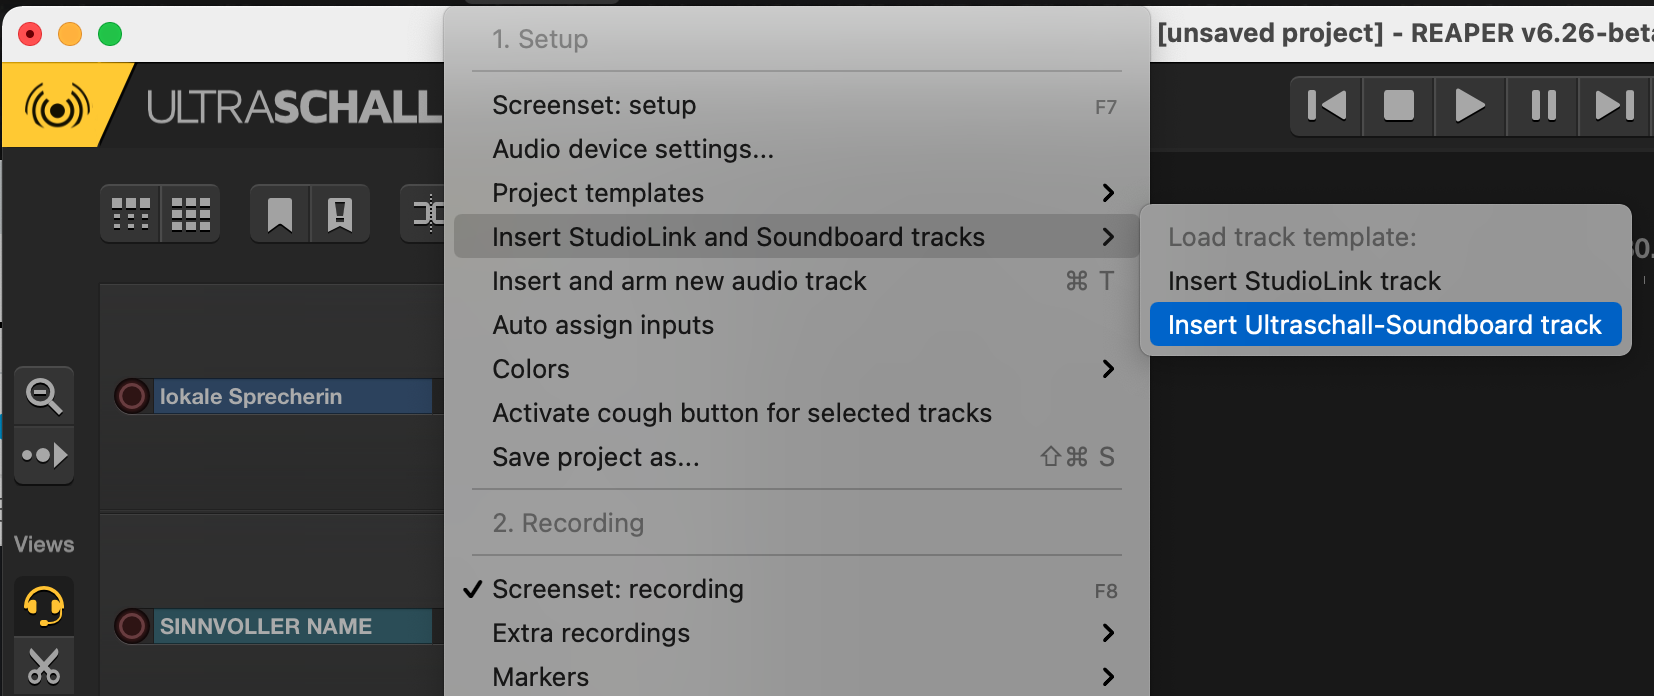 Insert soundboard - option 1: Use the podcast menu to insert a soundboard track.
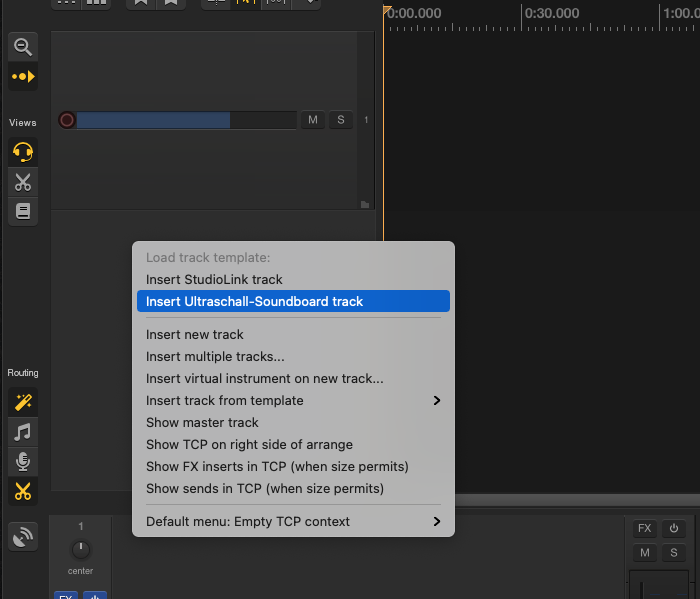 Insert soundboard - option 2: You can also insert a soundboard track by right-clicking in the track area.
We recommend creating only one soundboard track per project. Sounds for a project should therefore be combined from different directories into one soundboard before recording.
Operation
To teach the soundboard where your sound files are located, select the corresponding track and switch to the view for the plug-in list by clicking on the corresponding FX button of the track in the mixer area [24]. There you make sure that the 'Soundboard' plug-in is activated (tick is set). Use the folder symbol at the top left of the plug-in area to define the directory, in which you have saved the sound files for the soundboard.
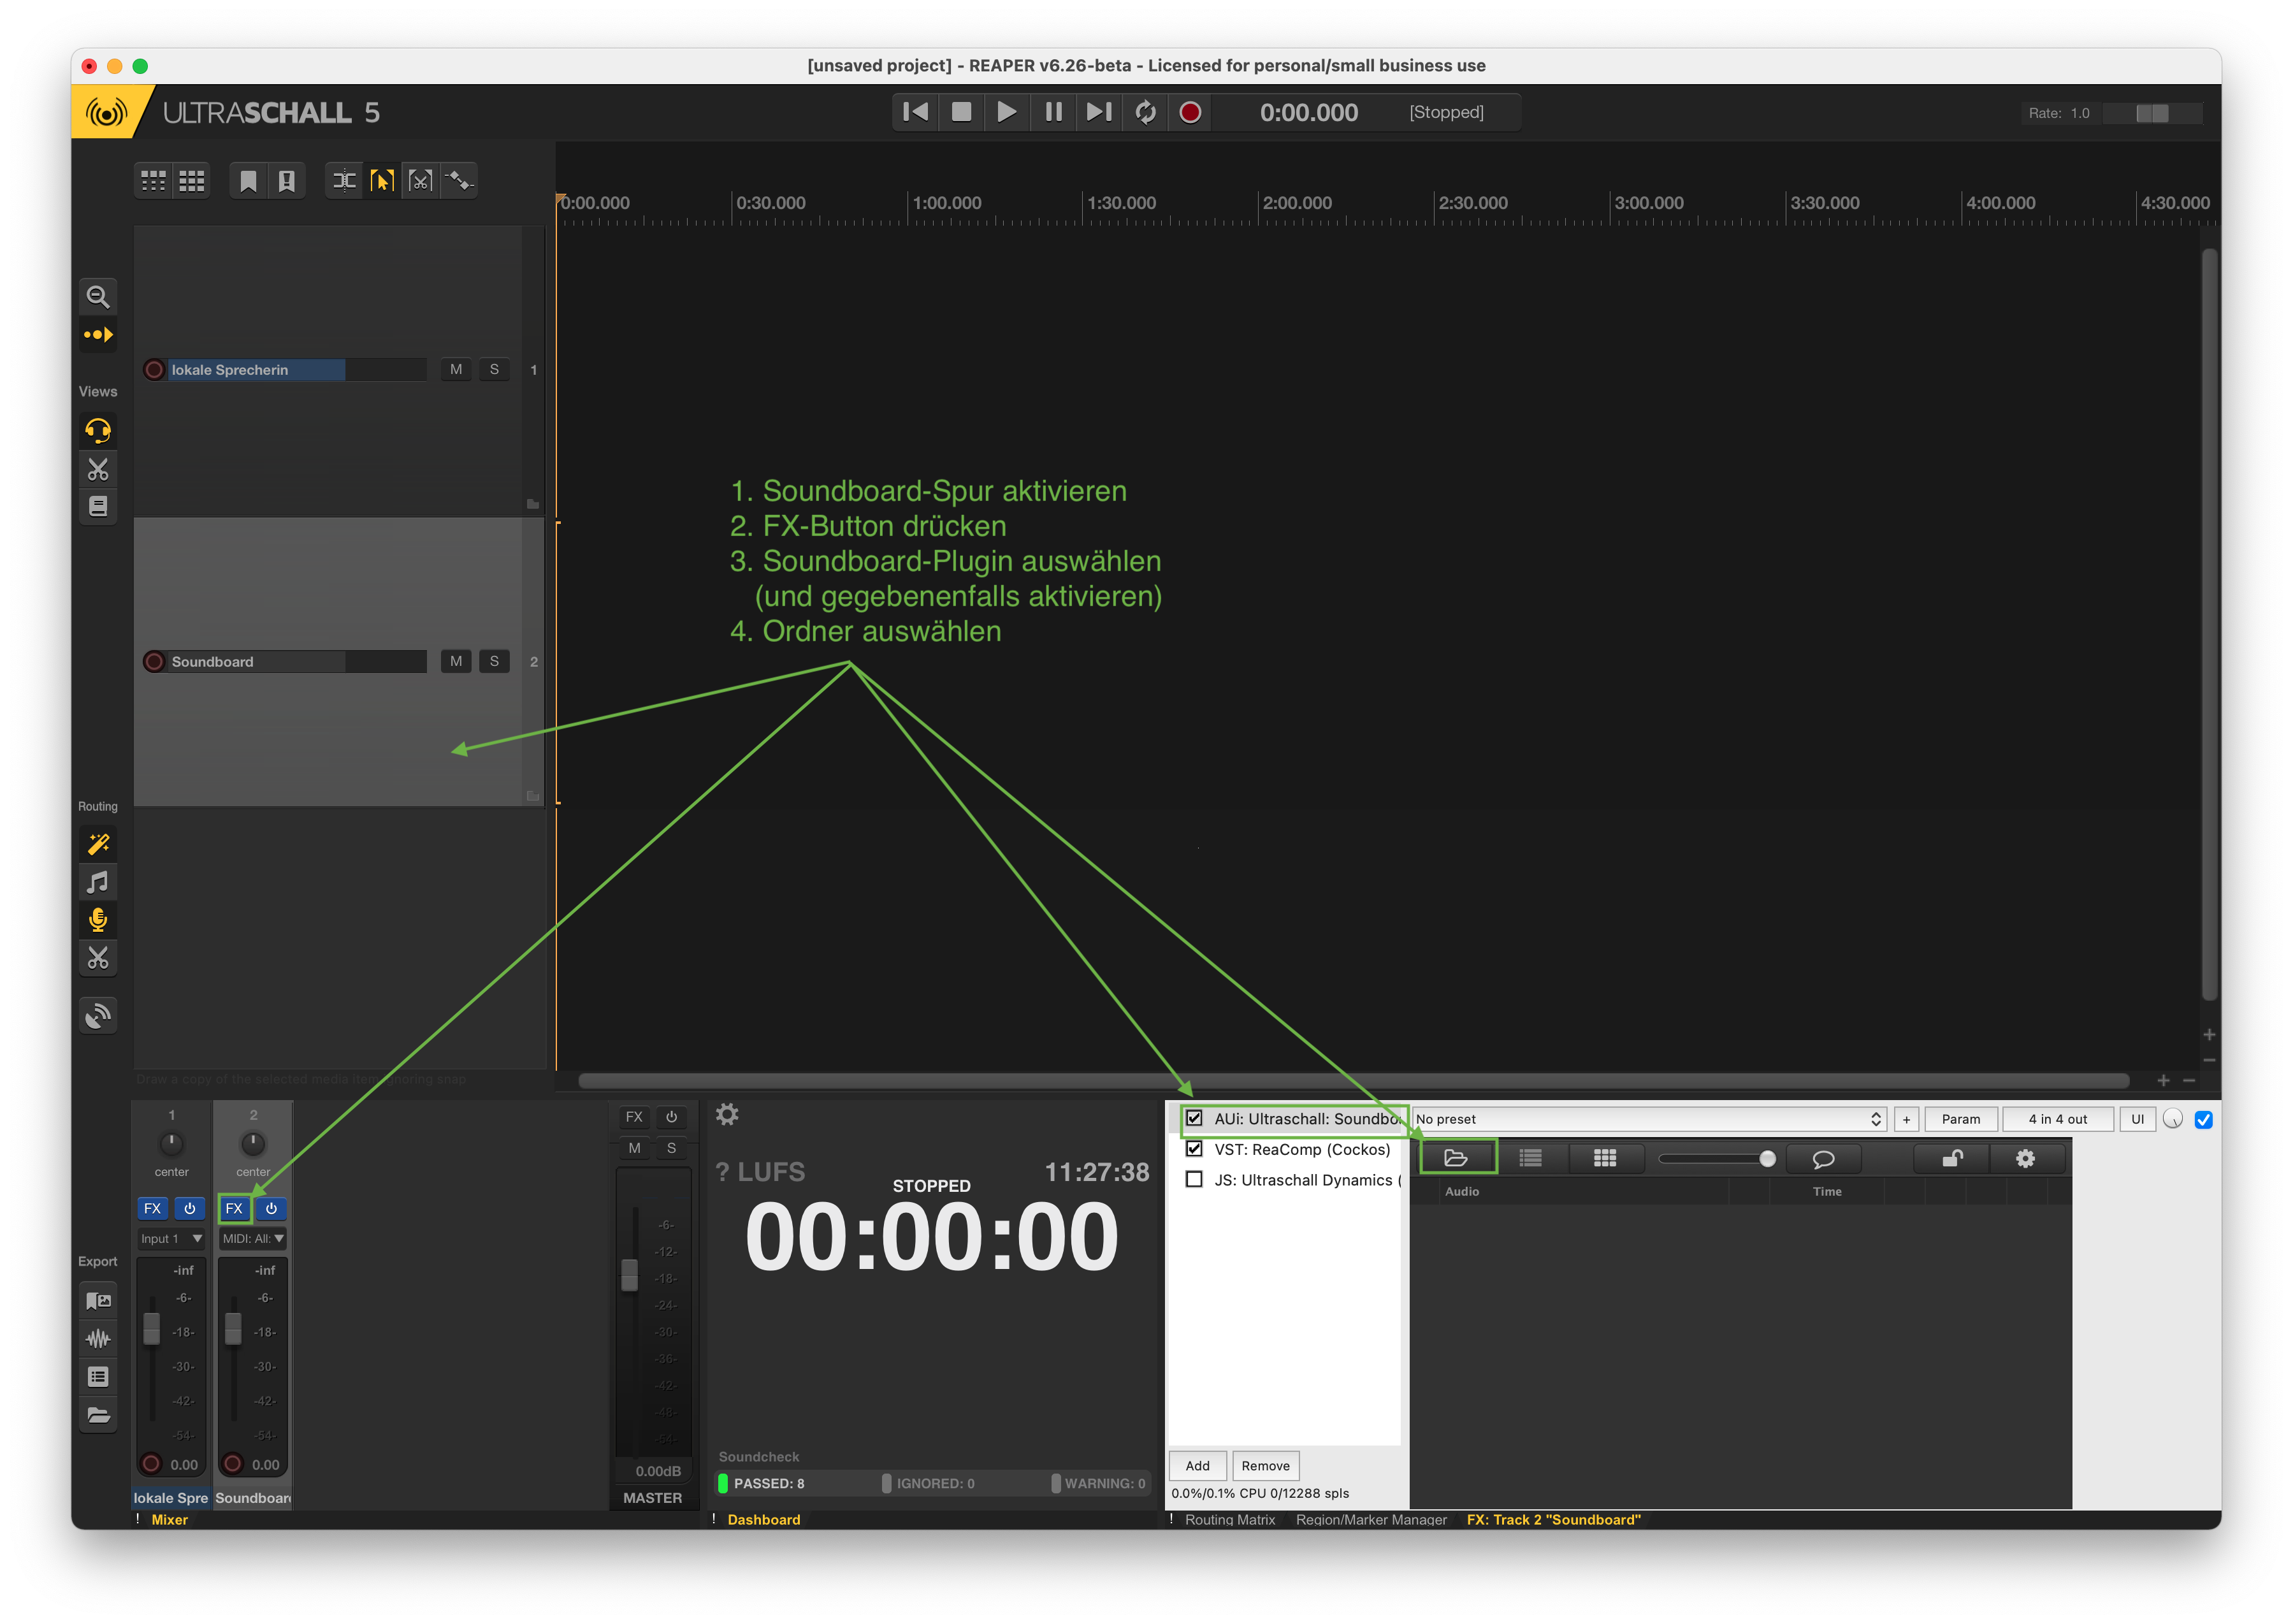 Soundboard activation: This is how you activate a soundboard.
The files are always displayed here in alphabetical order. If you prefer to sort the files in the same order as you might use them in your recording, it is best to put a number in front of the file name.
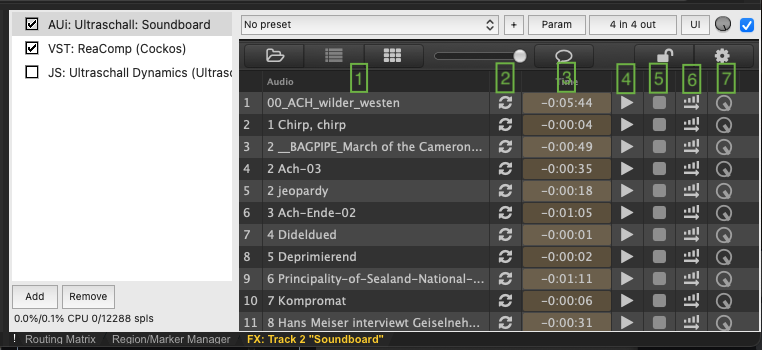
Soundboard: This is what a filled soundboard looks like.
The Soundboard controls in detail
- File name of the audio clip (without file extension).
- Loop function: if activated, the clip plays in an endless loop after pressing the play button [4].
- Remaining time display: shows how long the clip will continue to play - before playback, it therefore shows the total running time of the clip.
- Play button: starts the playback of the player
- Stop button: interrupts the playback of the player
- Soft fade-in: starts playback like [4] - starts mute, volume increases over about five seconds; the rest of the clip plays at the set volume
- Volume: individual volume setting for the respective clip.