First steps with ultraschall
Overview��
Now you can really start podcasting!
According to the Ultraschall philosophy, podcasting is divided into three phases:
- Preparation (Setup): This includes setting up the Ultraschall project, configuring the audio equipment and setting up the tracks.
- Recording (Recording): This includes the recording itself, but also things like the soundboard, chapter markers, the inclusion of people via studio link or live streaming of the programme to the internet.
- Post-processing (Production): Post-production includes editing, audio production (mixing, normalising, sound processing and so on), enrichment with meta-data and export.
You will also find this structure in the 'Podcast' menu of Ultraschall and in some other places within the software. To get to know the software and its possibilities a little better, it is a good idea to go through the (chrono-)logically structured menu items one by one.
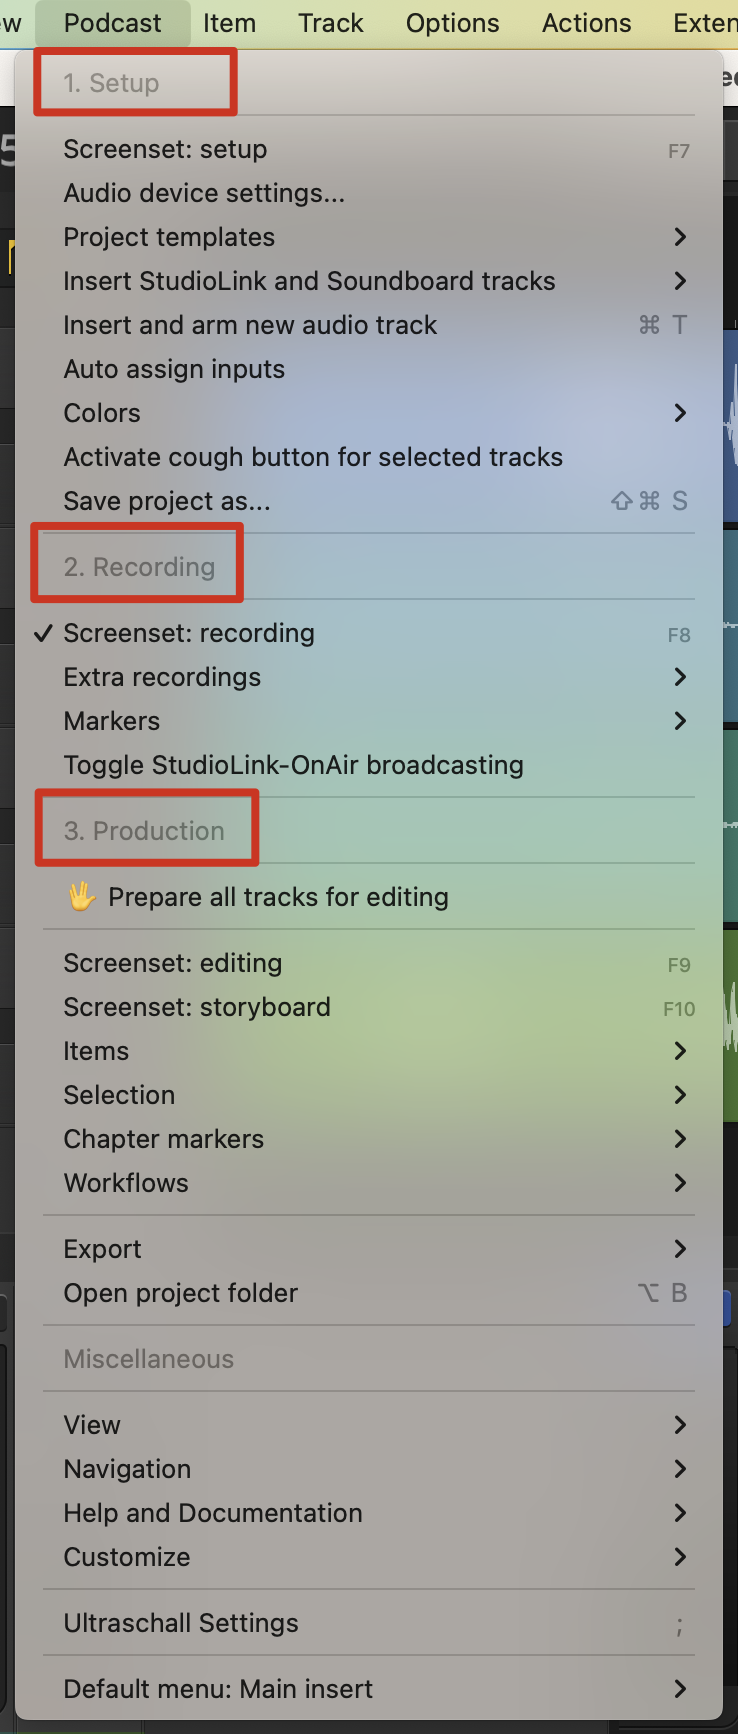
*The Podcast Menu: *The workflow is divided into three parts: 1.Setup, 2. Recording and 3. Production.
1. preparation
Create tracks
After you have started Ultraschall, you can now create the necessary tracks. Create a separate track for each speaker - either by double-clicking in the track area [23] or by right-clicking and selecting the option 'Insert new track' from the context menu.
Select devices
Select your recording device in the preferences (in the menu under Preferences>Device) under Audio Devices. Left-click on each track and select 'Input: Mono' in the Mixer [24] to assign the corresponding source to each track.
2. recording
Provided you have set everything up correctly, the recording itself is not too big a deal. Nevertheless, there are a few things you can and should consider after pressing Record[35], so that there are no unpleasant surprises or avoidable extra work for you later. The first and most important tip: Take a look at your recording software from time to time (it's best to deactivate the screen saver during recording). Then you will immediately see any error or warning messages - for example, Ultraschall warns you if you have not activated the tracks or saved the project yet. And you will also be informed if something is wrong with the track settings or if a person is clipping.
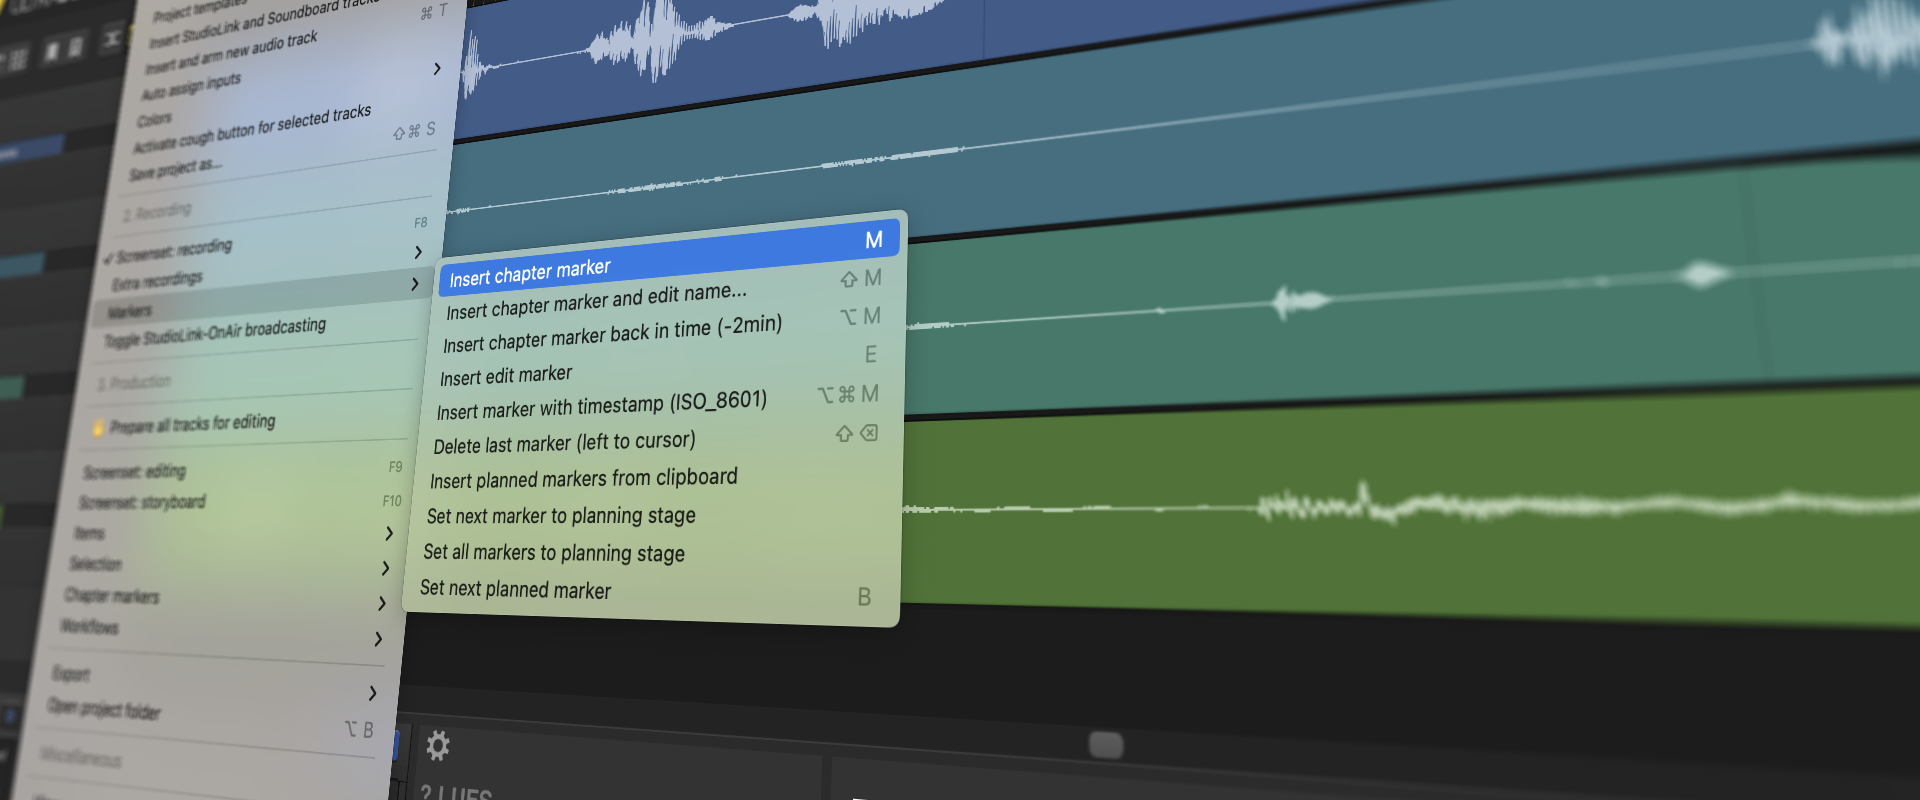
The integration of other speakers via the internet is explained in more detail in the chapter recording. How to use a soundboard to integrate sound effects, music and other interludes during the programme is explained here. It is also useful to keep an eye on the levels during recording and to set chapter and edit markers directly if necessary.
3. follow-up
In many cases, podcast production consists only of editing, audio production and export. This does not mean, however, that more complex scenarios such as elaborate radio play productions are not possible with Ultraschall - you will find the details in the corresponding later chapters.
After the end of your recording and before editing, it is essential to call up 'Prepare all tracks for editing' from the 'Podcast' menu. After that, tracks and studio link connections are deactivated, the routing is adjusted - and the interface is preset in such a way that you have hardly any risk of error, but maximum ease of use.
Cut
First of all, editing in Ultraschall is non-destructive and reversible at any time. So don't be afraid to remove too much at any point - your recordings will always remain in their original form (you will find them in your project directory [22] in the folder 'Recordings').
To remove content across all tracks (for example, at the beginning and end of the recording), select the desired section in the timeline workspace [25] by dragging and selecting while holding down the mouse button, or by selecting with
I- respectively
-key to set an In and an Out point for the current selection. Remove the selected area with the keyboard shortcut
Cmd + X
(Mac) respectively
Ctrl + X
(Windows, Linux) or by clicking on the cut button [12].

By default, all content that follows to the right of your interface will automatically "slide" to the content before it, creating a seamless transition.
Production
Every production is unique and differs depending on the microphone, recording conditions, special requests for effects and music, speaking discipline, and, and, and.
If you want all speakers to sound the same, the overall volume to be at a reasonable level and noise to be minimised or even automatically removed, be sure to check out the new AMP, the Automated Mixing Pipeline added in version 5 of Ultraschall. This combines some useful audio plug-ins and settings to produce a reasonable result for a large part of the podcast productions, without you having to go through sound engineer training.
Export
The export assistant simplifies exporting your project by guiding you through the necessary steps. It can be accessed from the menu via Podcast>Export and Start Export Assistant or via the corresponding button [21] on the left.

The export wizard guides you through the individual steps that are important for the export:
- export of the MP3 (the actual audio file)
- chapter markers
- ID3 Metadata (This is the metadata of the audio file: Episode Title, Author, Podcast Title, Year of Publication, Podcast Category, Description).
- podcast episode image (podcast episode cover)
- finalise MP3 (finalisation of the export)
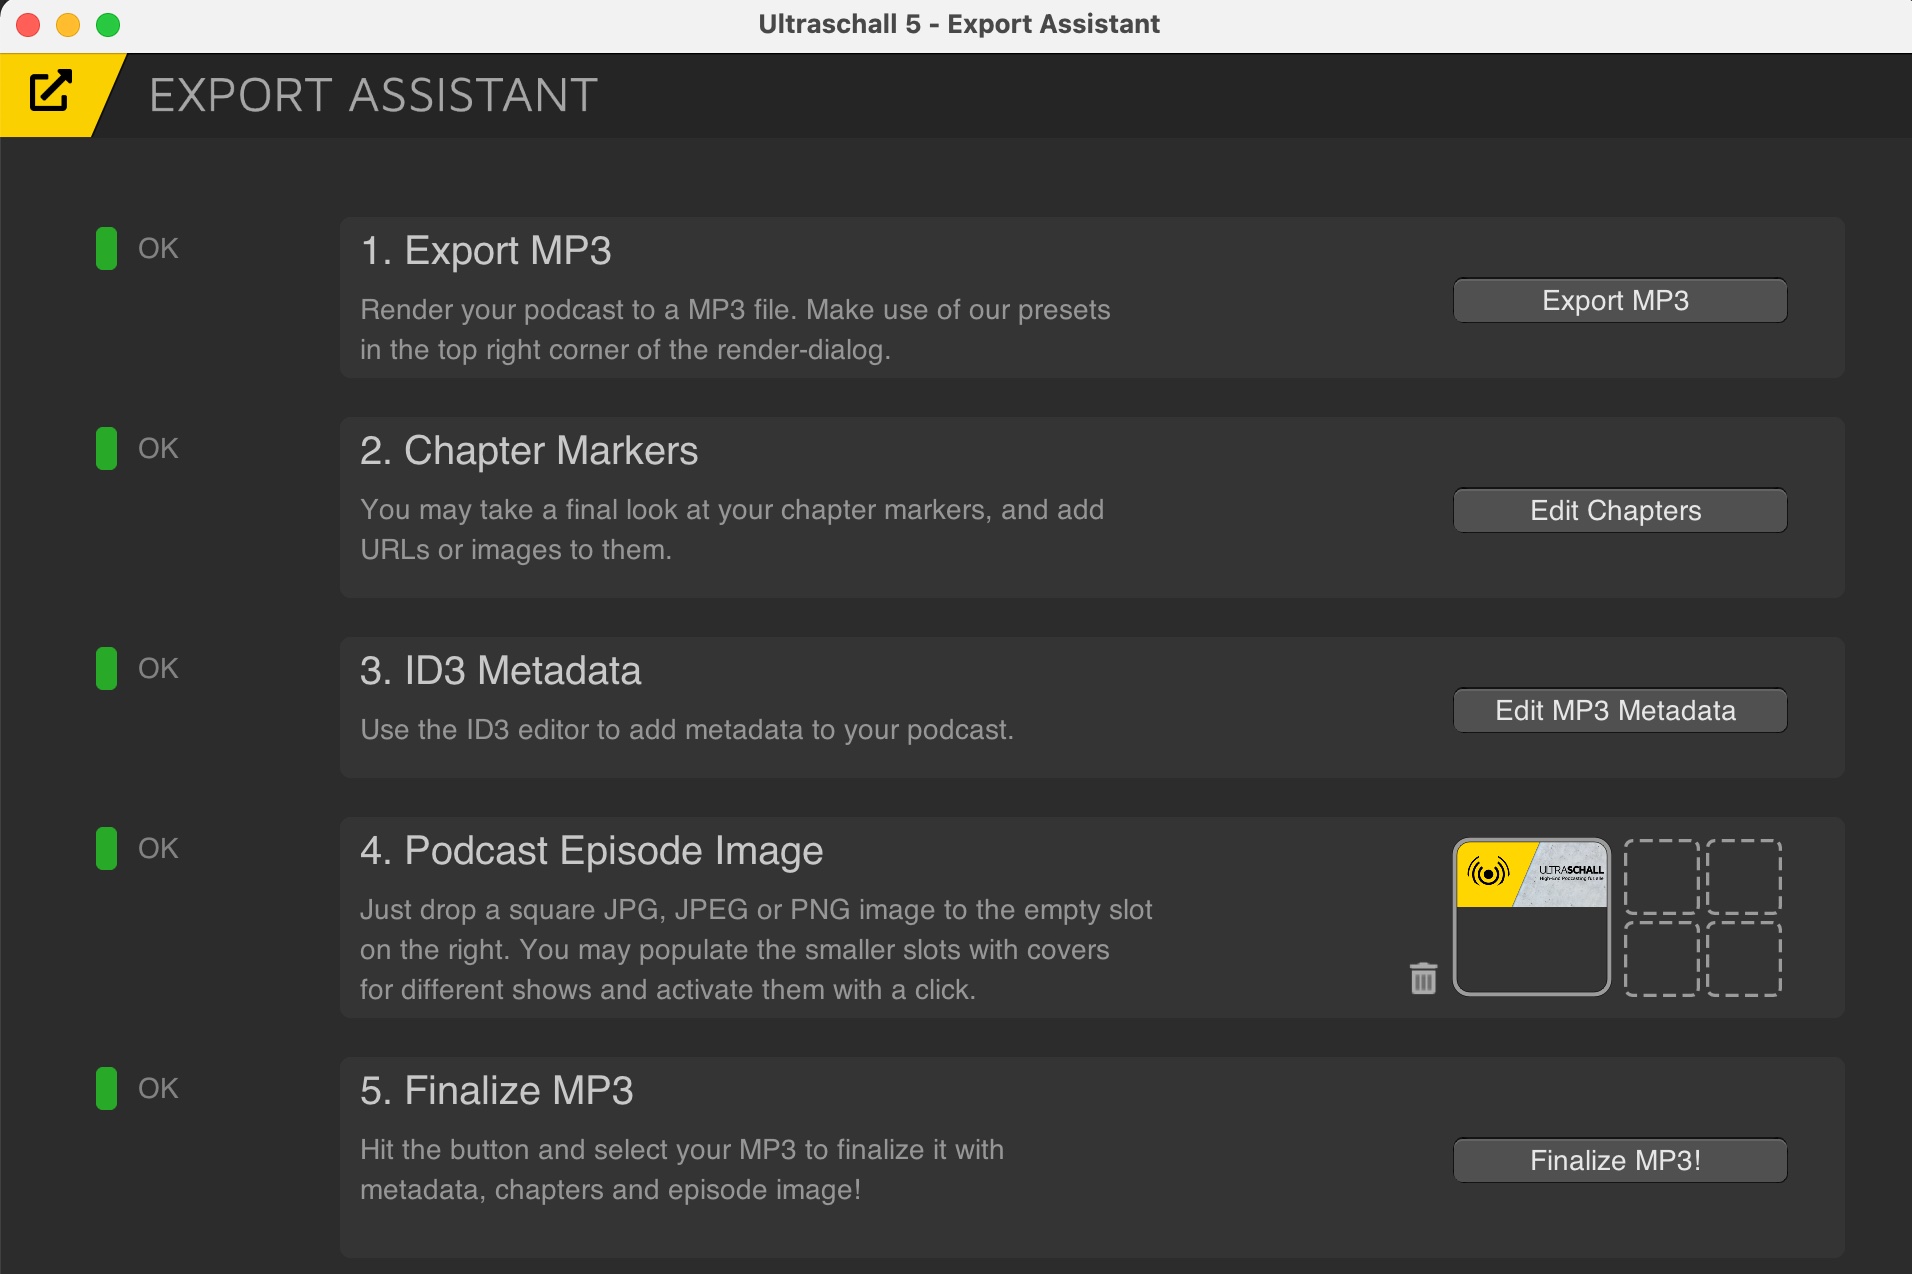 Export Wizard: When everything is ready to finalise, each item says:
 OK.
As you go through the individual steps, the colour changes from yellow or red to green (OK). The aim should be to give all aspects an 'OK' (green) - but how relevant the individual steps are for you and your podcast project can vary greatly from person to person. The finished audio file and possibly your chapter markers are then in your project folder. You can now process and publish them. Congratulations, you have successfully recorded, edited and exported your first podcast episode!